Tag Archives: Food

Italian Chocolate Panna Cotta

Standard

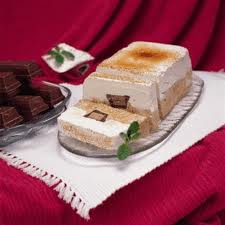
Panna cotta has become a very popular dessert on our shores these last few years, and for good reason. It’s a luscious, totally Italian custard, no eggs, just cream and flavorings. This is good served alone or with the slightest dusting of finely ground cocoa nibs or shaved chocolate. Panna cotta is usually vanilla—this one is for us chocolate lovers.

Panna cotta 3

Ingredients:
1 1/2 cups heavy cream
1 1/4 tsp. plain gelatin
1/4 cup mascarpone cheese or additional heavy cream
2 tbsp. granulated sugar
Pinch of salt
2 oz. bittersweet or semisweet chocolate, finely chopped

Instructions:
Coat four 5-oz. ramekins or 6-oz. custard cups lightly with flavorless oil.

Pour 1/4 cup of the cream into a small heatproof bowl, sprinkle the gelatin over it and let stand until softened, about 10 minutes. Place the bowl in a larger bowl of hot water and stir until the gelatin has dissolved.

Meanwhile, in a saucepan over medium heat, bring the remaining 1 1/4 cups cream, the mascarpone, sugar and salt just to a boil. Remove the pan from the heat, add the chocolate and whisk until smooth.

Add the gelatin mixture to the chocolate mixture and stir until well blended. Pour through a fine strainer into a 4-cup glass measuring cup or a bowl with a pour spout. Divide the mixture evenly among the ramekins and let cool to room temperature.

Cover the panna cotta loosely and refrigerate until set and thoroughly chilled, at least 3 hours or up to 1 day.

To serve, dip the ramekins one at a time into a bowl of hot water for about 5 seconds, then run a table knife around the edges of the custard and invert onto a chilled serving plate.

Chocolate Brigadeiros from Brazil

Standard

Brigadeiros, or chocolate bon bons, were created in Brazil in the 1940s to support a candidate’s campaign who was running for President. This no-bake gooey, chocolate-y, caramel-y treat is super delicious!

Brigadeiros from Brazil 2

Prep Time: 45 min Total Time: 1 hr 30 min Servings: 40

Ingredients

2 cans (14 oz each) sweetened condensed milk (not evaporated)
1/4 cup unsweetened baking cocoa
2 tablespoons unsalted butter
1/2 cup chopped pistachio nuts
1/3 cup chopped sliced almonds
1/3 cup shredded coconut
1/3 cup chocolate candy sprinkles
1/3 cup colored candy sprinkles

Directions

1) Grease large shallow pan or platter with butter. In 4-quart nonstick heavy saucepan, heat condensed milk, cocoa and 2 tablespoons butter to boiling, stirring constantly with wooden spoon. Reduce heat to medium-low; cook 10 to 15 minutes, stirring constantly, until mixture is thick and shiny and starts to pull away from bottom and side of saucepan when pan is tilted. Pour mixture into shallow pan; cool completely (refrigerate to firm up faster).

2) Place remaining ingredients in separate small bowls. Use teaspoon or melon baller to scoop truffle mixture, then use greased hands to shape into 1- to 1 1/2-inch balls. Roll each ball in pistachios, almonds, coconut or sprinkles. Place in mini paper baking cups.
3Store tightly covered at room temperature up to 2 days or in the refrigerator up to 1 week.

Tips
To make rolling the balls easier, chill the truffle mixture in the refrigerator until firm before scooping and rolling it. Toast the almonds and/or pistachios, if desired, before rolling the truffles. Put a variety of truffles in small gift boxes for friends and family.

South African Chocolate Crunchies

Standard

Africa produces around 70% of all cocoa beans so no wonder chocolate is popular here. Try this authentic South African Chocolate Crunchies recipe to bring a bit of culture and sweetness to your home!

South African Chocolate CrunchiesSouth African Chocolate Crunchies 2

Prep time › 10 mins
Cook time › 20 mins
Serves › 24 squares

Ingredients
1 cup flour
1 cup oats
1 cup coconut
1/2 cup sugar
2 tbsp cocoa
1/2 cup butter
1/2 cup margarine
2 tbsp syrup
1 tsp baking soda

Ingredients for Icing:
1 cup icing sugar
1 tsp vanilla
2 tsp milk

Directions:
1. Preheat oven to 350 F.
2. Mix all the dry ingredients for the crunchies, except for the baking soda.
3. Melt the butter and syrup together. Mix in the baking soda.
4. Combine the dry and wet ingredients, mix well.
5. Press into a medium sized greased baking pan, about 10 by 8 inches. Use the back of a spoon to press the mixture together and smooth the top.
6. Bake for 20 minutes at 350 F.
7. In a bowl, mix together the icing ingredients.
8. Put in the microwave for 1 to 2 minutes until the mixture is smooth.
9. Pour the hot icing over the hot crunchies to cover their entire surface.
10. Cut into squares when cool.

The World As Chocolate -Nanaimo Bars Recipe

Standard

These chocolate bars are great for entertaining and can be prepared days before your event.

Nanaimo (pronounced nah-NIGH-moe) Bars are a traditional Canadian bar cookie whose origins are said to be from Nanaimo, British Columbia.

NanaimoBar2

Cuisine: British Columbia
Yields: 1 (8-inch by 8-inch) pan
Prep time: 30 min

Bottom Layer – Crust Base:
1 egg, beaten
1/2 cup unsalted butter, room temperature
1/4 cup granulated sugar
5 tablespoons unsweetened unsweetened cocoa
1 1/4 cups graham cracker/wafer crumbs
1/2 cup finely-chopped almonds or pecans
1 cup sweetened coconut flakes

Custard Filling – Second Layer:
1/2 cup unsalted butter, room temperature
2 tablespoons plus 2 teaspoons heavy cream
2 tablespoons vanilla custard powder (Bird’s Custard Powder is preferred)*
2 cups powdered (confectioners’ sugar)

* Bird’s Custard Powder is widely available in the UK and Canada. However, it is harder to find in other areas of the world. If you are unable to find it, you could substitute instant vanilla pudding or corn starch. It’s not quite the same, but it is a good substitute.

Chocolate Topping – Top Layer:
4 squares (1 ounce each) semi-sweet chocolate or 4 ounces semi-sweet chocolate chips
2 tablespoons unsalted butter

Preparation of Nanaimo Bars:

Line a 8-inch by 8-inch square baking dish or pan with either plastic wrap or aluminum foil. The original recipe does not call for lining the pan, but believe me, this makes for a must neater and easier removal of the finished bars.

Bottom Layer – Crust Base:

Place the beaten egg in a small bowl; set aside.

In a heavy saucepan over low heat, melt the butter, sugar, and cocoa. Whisk a small amount of the hot melted mixture into the egg. Return the egg mixture to the pan, whisking constantly. Cook and stir until mixture reaches 160 degrees F. on your cooking thermometer and begins to thicken. Remove from heat.

Stir in the graham cracker crumbs, almond or pecans, and coconut. Press the cracker mixture firmly into the prepared baking dish or pan. Set aside.

Custard Filling – Second Layer:

In a large bowl of your electric mixer, cream together the butter, cream, custard powder, and powdered sugar until well blended. Spread over the Crust Base. Refrigerate at least 15 minutes or until set.

Chocolate Topping – Top Layer:

In a large saucepan over low heat, melt together the chocolate and butter. Remove from heat and pour the chocolate mixture over the chilled Custard Filling. Refrigerator at least 1 hour or until set.

Nanaimo Bars may be stored in the refrigerator, covered up to 1 month.

Served chilled.

Dream Treat

Standard

No-Bake Chocolate Cheesecake with Mixed Berries

Raspberries, strawberries, and blueberries colorfully adorn the top of No-Bake Chocolate Cheesecake with Mixed Berries. DELICIOUS, I promise!

no-bake-chocolate-cheesecake-berries-ck-l

Yield: Serves 14 (serving size: 1 slice)
Total: 6 Hours, 25 Minutes

Ingredients
4 ounces chocolate wafers (such as Nabisco Famous Chocolate Wafers)
1 tablespoon honey
2 teaspoons unsalted butter, melted
3 tablespoons 2% reduced-fat milk
1 1/2 teaspoons unflavored gelatin
10 ounce 1/3-less-fat cream cheese, softened
1 1/4 cups powdered sugar
1 cup plain fat-free Greek yogurt
1/2 cup dark unsweetened cocoa powder (such as Hershey’s Special Dark)
1/2 teaspoon vanilla extract
1 ounce bittersweet chocolate, melted and cooled
1/4 cup whipping cream
1 1/2 cups raspberries
1 1/2 cups strawberries, quartered
1 cup blueberries

Preparation
Hands On: 25 Minutes
Total: 6 Hours, 25 Minutes
1. Place chocolate wafers in a food processor; process until finely ground. Place ground wafers in a bowl; stir in honey and butter. Press mixture into bottom and up sides of a 9-inch round removable-bottom tart pan. Cover and freeze 1 hour or until firm. Wipe food processor with a paper towel.
2. Combine milk and gelatin in a microwave-safe bowl; let stand 3 minutes. Microwave at HIGH 15 seconds; stir until gelatin dissolves. Cool slightly.
3. Combine cream cheese and next 4 ingredients (through vanilla) in food processor; process until smooth. Add milk mixture and cooled melted chocolate; process until smooth. Place whipping cream in a clean bowl; beat with a mixer at high speed until stiff peaks form. Gently fold one-fourth of chocolate mixture into whipped cream. Fold whipped cream mixture into remaining chocolate mixture. Spoon chocolate mixture into prepared crust. Chill 6 hours or until set.
4. Combine berries in a bowl. Top cheesecake with berry mixture.

Auberge Du Chocolate – Orange Dessert

Standard

This chocolate is named after the ice cream and looks stunning when cut into. Any remaining fruit paste tastes fantastic dipped in bitter dark chocolate and any remaining ganache can be flavoured and used for truffles.

Auberge Du Chocolate

Yield: 12 servings

Ingredients

1 zest of one orange lightly crystallized
250ml double cream
600g dark chocolate, chopped or in pellet form
4ml rrange blosson oil
8ml Cointreau
2 oranges
40ml sugar
40ml water
500g dark chocolate, chopped or in pellet form for dipping

Preparation

1. Prepare the lightly crystallised orange zest and dry it out at 100°C – in the oven, turning once or twice. Store any leftover zest in an airtight container .

Making crystallized fruit peel and grated zest

Simply grate the zest of a citrus fruit of your choice, then dip it into a simple sugar syrup, made by boiling 1 part sugar in 1 part water until the sugar has dissolved.

Leave the dipped zest to dry, then place on top of just-dipped chocolates so the peel sticks as the chocolate sets.

2. Temper 150 g (5 oz) of dark chocolate and spread onto a sheet of baking parchment. When touch dry, cut out 1.5 cm (3/4 in) circles with a pastry cutter.

Tempering Chocolate

Melt the quantity of chocolate you need. Pour approximately two thirds of the melted chocolate onto the marble.

Use a large, flexible scraper to repeatedly pull the chocolate together and then spread it out. This causes the chocolate to cool quickly and to thicken. The chocolate now contains a number of ‘seed’ crystals. As the chocolate temperature drops, more crystals form. You want to get plain chocolate to about 29°C – check this by putting a tiny piece of the chocolate on your bottom lip. If it feels cool, it should be ready.

Once you reach the required temperature, quickly stir in the remaining third of the melted chocolate. This will melt or stabilize any unstable crystals. If this doesn’t work, it is possible that there are not enough ‘seed’ crystals in the first two thirds (for example, if the chocolate hasn’t been cooled enough) or the remaining third is too hot. Unfortunately, should this be the case you will have to start all over again. When tempered, transfer the chocolate to a bowl ready for use.

3. Warm the cream a little. Add the milk chocolate and stir until all the chocolate is incorporated. If you still have lumps of chocolate, warm the mixture for about 10 seconds in the microwave and stir again.

4. Stir in the orange blossom oil and the Cointreau.

5. Using a piping bag and a 1 cm (1/2 in) nozzle, pipe the ganache onto the dark chocolate circles and leave to set.

6 When set, dip each chocolate in the remaining tempered chocolate so it is fully sealed. Sprinkle the tops of the chocolates with the crystallized orange zest, then leave to set before cutting away any ‘feet’ from the chocolate.

Chocolate Is My Kryptonite

Standard

Fortunately, there are only a few things that I simply refuse to live without. Chocolate ranks pretty high on that list. So, I am constantly looking for fun recipes that are easy and delicious. Here is a new favorite!

Monster Marshmallow Cookies

Monster Marshmallow Cookies

Total Time: 45 min
Prep: 20 min
Cook: 25 min
Yield: 4 dozen cookies

Ingredients

For the Cookies:
2 cups all-purpose flour
1 teaspoon baking powder
1/2 teaspoon baking soda
2 sticks unsalted butter, softened
1 cup granulated sugar
1 cup packed light brown sugar
2 large eggs, at room temperature
1 tablespoon vanilla extract
2 cups quick-cooking oats
1 1/4 cups crispy rice cereal
1 cup milk chocolate chips
1 cup coarsely chopped pecans
1 cup miniature marshmallows

For the Topping:
1/2 cup milk chocolate chips
1/2 cup miniature marshmallows
2 1/2 teaspoons half-and-half
Pinch of cayenne pepper
1/3 cup finely chopped pecans

Directions

Make the cookies: Preheat the oven to 350 degrees F. Line 2 baking sheets with parchment paper. Combine the flour, baking powder and baking soda in a large bowl. In a separate bowl, beat the butter and both sugars with a mixer on medium-high speed until fluffy. Beat in the eggs one at a time on medium speed, then beat in the vanilla. Add the flour mixture and beat on low speed until combined.

Stir the oats, cereal, chocolate chips, pecans and marshmallows into the dough with a wooden spoon. Wrap with plastic wrap and refrigerate the dough for 30 minutes. Drop heaping tablespoonfuls of the dough onto the prepared baking sheets, about 3 inches apart. Bake the cookies in batches until golden, 10 to 12 minutes. Let cookies rest on sheet pans to cool slightly, about 10 minutes. Transfer to racks to cool.

Make the topping: Combine the chocolate chips, marshmallows, half-and-half and cayenne pepper in a saucepan over medium heat; cook, stirring, until the mixture is smooth, about 5 minutes. Remove from the heat. Stir in the pecans. Drizzle the mixture over the cookies and let set, about 4 hours.

Decadent Chocolate Mousse

Standard

This easy chocolate mousse recipe is perfect to make ahead and best served in your fun drink glasses.

Classic-chocolate-recipes-chocolate-mousse

Serves: 6
Prep Time: 30 mins
Cook Time: 2 mins

Ingredients

200ml (7oz) double cream
200g (7oz) milk chocolate, chopped
2 tbsp Grand Marnier (optional)
2 medium eggs, at room temperature
Shavings of white chocolate, to decorate

Method

Put cream into a pan and heat until almost boiling. Take off the heat, add the chocolate – don’t stir – and leave for 5min. Add Grand Marnier, if using, and stir until glossy. Pour into a large bowl and leave to cool until tepid.
Separate the eggs – it’s important not to get any yolk in the white or you won’t create volume when you whisk up. Using an electric hand-whisk, beat the yolks into the chocolate for 1 min until smooth. Wash and dry whisks thoroughly, then whisk the egg whites until they form stiff peaks.

Using a metal spoon, stir a spoonful of whisked egg white into the chocolate mixture – this will loosen it so it’s easier to fold in the rest. Gently fold in remaining egg white (taking care not to knock out air) until mixture has no white blobs.
Spoon the mousse into six glasses and chill until set. Serve after an hour if you like a soft set – mousse will keep in the fridge for 24 hours. Take out of the fridge an hour before serving, then decorate with white chocolate shavings.

Dream Treat Part Deux

Standard

So nice, I thought I’d do it twice. For my #chocolate lovers, this is for you. It may not work for any #chocolate lover wannabe’s. Believe me, the CHOCOLATE GODS will know if you’re faking… Enjoy!

Iced Chocolate Bar Cake

Preparation time : 20 minutes Freezing time : 12 hours

Ingredients

1 tin NESTLÉ® Sweetened Condensed Milk
2½ cups whipped cream
2 bars KIT KAT® CHUNKY
1½ tablespoons NESCAFÉ Instant Coffee, dissolved in 2 tablespoons hot water

Preparation

Combine NESTLÉ® Sweetened Condensed Milk and whipped cream in an electric mixer. Beat until thick and creamy.

Pour half of the mixture into foil lined 9in x 5in loaf pan. Place KIT KAT® CHUNKY bars in the middle and freeze for ½ an hour.

Add NESCAFÉ Instant Coffee to the remaining cream mixture and mix until combined.

Take out the cake from the freezer. Spoon over the NESCAFÉ mixture, cover with cling film and freeze for at least 12 hours until set.

Cut into slices to serve.

Dream Treat

Standard

MAHO HALWA Recipe

MAHO HALWA

Cooking time : 45 minutes

Ingredients

¼ cup butter or 60 g
2 tins NESTLÉ® Sweetened Condensed Milk or 790 g
1 teaspoon ground cardamom
½ teaspoon saffron filament

Preparation

Melt Butter in a deep saucepan, add 2 tins NESTLÉ® Sweetened Condensed Milk , and Cardamom Powder and cook over medium heat with constant stirring until color has become golden brown but not burnt. About 40 minutes.

Once the Halwa hold together and have a stretchy consistency, stir in Saffron Strands and remove from heat. Allow the mixture to cool slightly before pouring into desired mold to fully cool.

Cut into shape and serve.