Monthly Archives: March 2017

Samoas Cookie Pie

Standard

Thin Mints and Samoas are my favorite Girl Scout cookies and since I already have a fast, easy, no-bake, and foolproof Thin Mints recipe, it was time to tackle Samoas.


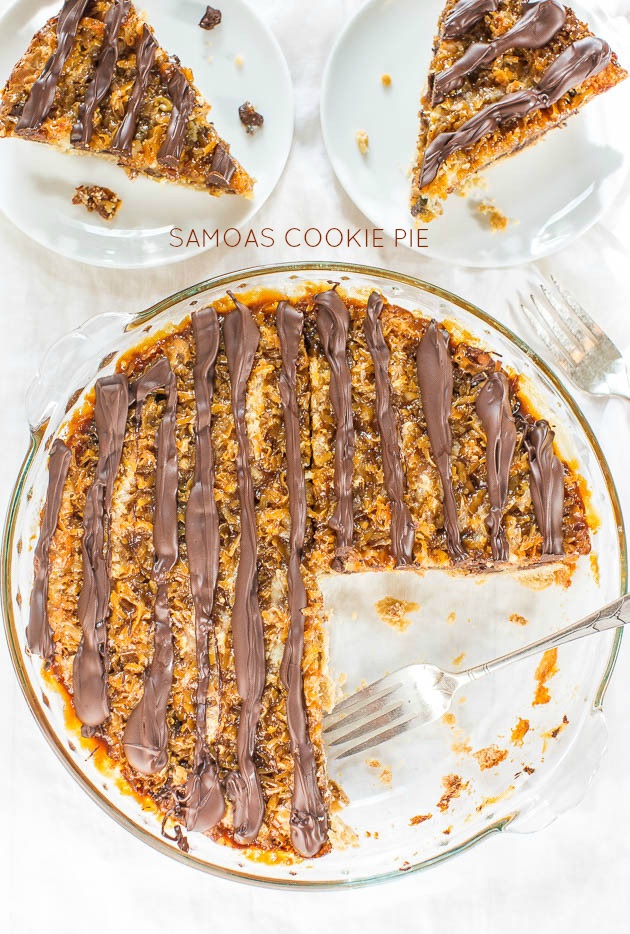
The textures and flavors are all there in this giant Samoa cookie. Gooey, chewy, sticky, sweet, and wonderful. Dare I say this may even be better than the real thing.

It’s a fast, easy, no-mixer recipe that comes together in minutes and there’s nothing fussy about it. Making individual Samoas cookies is way too labor-intensive and this giant cookie is the opposite.

I made a simple stir-together dough for the crust before topping with chocolate chips, shredded coconut, sweetened condensed milk, salted caramel, and a final chocolate drizzle.

samoascookiepietext


INGREDIENTS:

1/2 cup unsalted butter (1 stick), melted
1 large egg
1/2 cup light brown sugar, packed
1 teaspoon vanilla extract
1 1/4 cups all-purpose flour
1/4 teaspoon salt, or to taste
3/4 cup semi-sweet chocolate chips, for sprinkling
1 1/2 cups sweetened shredded coconut, loosely laid in measuring cup (not packed)
two-thirds of one 14-ounce can sweetened condensed milk (about 10 ounces)
4 to 5 ounces salted caramel sauce (use homemade salted caramel or store bought, regular caramel sauce may be substituted)
3/4 cup semi-sweet chocolate chips, melted for drizzling

DIRECTIONS:

  1. Preheat oven to 350 F. Spray a 9-inch pie dish very well with cooking spray; set aside.
  2. In a large, microwave-safe bowl melt the butter, about 1 minute on high power.
  3. Wait momentarily before adding the egg so you don’t scramble it. Add the egg, brown sugar, vanilla, and whisk until smooth.
  4. Add the flour, salt, and stir until just combined; don’t over mix.
  5. Turn batter out into prepared pie dish, smoothing the top lightly with a spatula. Bake for about 10 to 12 minutes or until edges firm up slightly and center will have begun to set up a bit. It’s by no means done, but pie will be returned to oven to bake another 25 minutes or so.
  6. Remove pie dish from oven, and evenly sprinkle 3/4 cup chocolate chips over the crust.
  7. Evenly sprinkle the coconut.
  8. Evenly drizzle the sweetened condensed milk (just eyeball it).
  9. Evenly drizzle the caramel sauce (just eyeball it).
  10. Return pan to oven and bake for about 25 minutes, or until there’s slightly bubbling near the edge of dish and the center has dried out some and looks more set. Cookie pie will firm up more as it cools. In the last 10 minutes of baking, watch it like a hawk because the coconut, caramel, and sweetened condensed milk will all be prone to burning; better to underbake than overbake if you’re unsure.
  11. Allow pie to cool in dish on a wire rack while you melt the chocolate for drizzling by adding 3/4 cup chocolate chips to a small microwave-safe bowl and heat to melt, about 1 minute on high power. Stop to check and stir and heat in 10-second increments until chocolate can be stirred smooth.
  12. Using a spoon (or pastry bag or ziptop bag with corner cut off if you want to be fancier but I didn’t bother), evenly drizzle the chocolate in long vertical lines, parallel to each other, spaced about 1/2-inch apart. Pie doesn’t have to be cooled to add the chocolate drizzle.
  13. Allow pie to continue to cool on wire rack for at least 4 hours (or overnight) before slicing and serving. Don’t slice too early because chocolate drizzle needs to set and interior of pie needs to firm up or you’ll have a literal hot mess. Pie is best fresh, but will keep airtight at room temperature for up to 5 days, or in the freezer for up to 6 months. I store it by slicing into small wedges, wrapping each wedge individually in plastic wrap, and putting those in a large zip-top bag.
Advertisement

Dark Chocolate Quinoa Cookies

Standard

I get on these kicks and I don’t let them go. And once I’ve set my mind to doing it, it’s getting done. No questions asked. Somehow, someway, it’s happening.

Like these dark chocolate quinoa cookies.

A few days ago, I was taken over by this intense need for chocolate cookies. I mean I wanted a chocolate cookie, like really, really, really bad. And of course I didn’t have any on hand. I poured over recipe after recipe looking for the best chocolate cookie recipe that I could recreate gluten-free, couldn’t find what I was looking for, proceeded to ask my wonderful Facebook friends if they had any recipes and since they’re just a bunch of smarties, they told me to substitute 1/2 cup cocoa powder into any of my favorite cookie recipe. Novel concept to me!

As I usually do, I listened. And the cookies turned out perfectly. Like absolutely perfect.

dark-chocolate-quinoa-cookies

Ingredients

  • 1 1/2 cup gluten-free all-purpose flour
  • 1/2 cup cocoa powder
  • 1/2 cup cooked quinoa
  • 1 teaspoon baking powder
  • 1/2 teaspoon fine sea salt
  • 2/3 cup light brown sugar (or coconut sugar)
  • 1/2 cup coconut sugar
  • 6 tablespoons vegan butter
  • 2 tablespoon melted coconut oil
  • 2 teaspoon tahini (or other nut butter)
  • 1 teaspoon pure vanilla extract
  • 2 large eggs
  • 1 cup dark chocolate chunks (or dairy-free chocolate chips)

Instructions

  1. Preheat the oven to 375 degrees F and line two baking sheets with parchment paper.
  2. Whisk together all the dry ingredients, minus the sugar and chocolate chunks, in a medium mixing bowl and set aside.
  3. In a small sauce pan, heat the butter over medium heat and cook until it begins to brown, about 5 minutes. Stir constantly so as not to burn the butter, you’re just trying to brown it. Transfer to a large mixing bowl, add the coconut oil and let cool for 5 minutes. Add the sugar and beat with an electric mixer until incorporate – the texture will be sandy, not creamy like traditional butter cookies. Add the tahini, vanilla and eggs and beat until combined.
  4. Pour in the flour mixture, beat on low until just incorporated. The mixture will be that of a thick brownie batter, not as doughy as normal chocolate chip cookies. Fold in the chocolate chunks with a wooden spoon.
  5. Scoop 1 heaping tablespoon of dough onto the cookie sheets, spacing the cookies about 1″ apart. Bake in the center of the oven for 14 minutes, switching/rotating the sheets half way through.
  6. Transfer to a wire rack, allow to cool for 5 minutes (if you can resist that long!), and enjoy!

Sunday Reflections

Standard

Have an amazing Sunday, and remember Daylight Savings Time is here in the US.

Sunday Reflections

Standard

Have an amazing Sunday and a peaceful week ahead, #friendsofTenaciousM!

83740a201fc4818556611657ebb936eb

Chocolate-Irish Cream Cheesecake in Las Cruces, New Mexico

Standard

After a short hiatus, I am happy to be back on my blog with more chocolate, love and travels!

This week I had a nice lunch with a co-worker at Salud de Mesilla in Las Cruces, New Mexico. Their “Bailey’s Irish Creme Chocolate Cheesecake” was so delicious that I had to find a comparable recipe. Here is the recipe and some sites from the day.

img_20170304_161103_160img_20170304_161730_863

Ingredients

1 1/2 cups finely crushed chocolate wafers (about 18 cookies)*
6 tablespoons butter, melted*
1/2 teaspoon ground cinnamon
3 8 ounce packages cream cheese, softened
1 8 ounce carton dairy sour cream
1 cup sugar
1 8 ounce package semisweet chocolate, melted and cooled
3 eggs
1/2 cup Irish cream liqueur
2 tablespoons whipping cream or milk
2 teaspoons vanilla

Directions

1. Preheat oven to 325 degrees F.

2. For crust, in a medium bowl, combine crushed chocolate wafers, melted butter, and cinnamon; toss gently to mix. Press mixture onto the bottom and up the side of a 9- or 10-inch springform pan. Set aside.

3. For filling, in a large bowl, combine cream cheese, sour cream, sugar, and melted chocolate. Beat with an electric mixer on medium to high speed until smooth. Using a wooden spoon, stir in eggs just until combined. Stir in liqueur, whipping cream or milk, and vanilla.

4. Pour filling into the crust-lined pan. Place springform pan in shallow baking pan. Bake for 50 to 60 minutes or until center appears nearly set when gently shaken.

5. Cool in springform pan on a wire rack for 15 minutes. Using a small sharp knife, loosen from side of pan. Cool for 30 minutes more. Remove side of springform pan. Cool for 1 hour. Cover and chill for at least 6 hours or up to 24 hours. Makes 16 servings.