Tag Archives: Egos & Buffaloes

Chocolate Butterfinger Pie

Standard

After testing, trying and enjoying a variety of peanut butter pies, I think this one is perfect! You can make this into small pies instead of a large one and everyone gets their own individual pie. Plus they can be individualized if someone doesn’t want certain garnishes on top.

Butterfinger-Pie-450x400 1

Yields 8 servings

INGREDIENTS

1 1/2 cups chocolate graham crackers, crushed (1 packet, 9-10 crackers)
6 tablespoons butter or margarine, melted
1 Butterfinger candy bar, crushed
8 ounces PHILADELPHIA Cream Cheese
1 teaspoon vanilla extract
1/4 cup dark brown sugar
1/4 cup granulated white sugar
1/2 cup creamy peanut butter
16 ounces Cool Whip, unthawed
8 oz ounces Cool Whip Extra
8 mini pie pans or ramekins
2 Butterfinger candy bar, crushed (divided into 2 bowls)
1 ounce mini semi-sweet chocolate chips or semi-sweet chocolate shavings
1 ounce crushed peanuts

Butterfinger-Pie-450x400 2

DIRECTIONS

FOR PIE CRUSTS: Mix together first three ingredients (chocolate graham crackers, butter and one Butterfinger).

Divide mixture evenly among eight mini pie pans, and press firmly into bottom and sides. Put pie shells into freezer to chill until ready to fill.

FOR PIE: Mix together next 7 ingredients (PHILADELPHIA Cream Cheese, vanilla extract, dark brown sugar, granulated white sugar, creamy peanut butter, and Cool Whip and 1 cup Butterfinger candy bar, crushed). Beat on med-low for 30 seconds, then scrap down sides of bowl. Beat on high for 1 minute. Pie filling is now ready.

TO FINISH: Evenly divide pie filling into eight mini pie pans. Garnish each pie evenly with the 8 oz ounces Cool Whip extra, crushed Butterfinger, mini semi-sweet chocolate chips or semi-sweet chocolate shaving, and crushed peanuts (all optional). Cover each pie and freeze for at least two hours before serving.

ADDITION: This can all be made into one large pie that serves 8 or into 8 mini pie pans for parties and other get togethers.

Icebox Chocolate Cheesecake

Standard

Brilliantly layered chocolate cookies with a quick mix of cream cheese, chocolate syrup, and a little water. The cookies soften as the cake chills overnight for a perfectly moist, chocolaty “cheater’s” cheesecake.

icebox-chocolate-cheesecake-recipe-fw0912-xl

Yields: 8 to 10 servings
Total Time: 30 min

Ingredients

70 (from 2 packages) Nabisco Famous Chocolate Wafers
24 ounce(s) (three 8-ounce packages) cream cheese, at room temperature
1 cup(s) chocolate syrup, such as Hershey’s
1/4 cup(s) water

Directions

1. Put 20 of the chocolate cookies (reserving 50 whole cookies) into a zippered plastic bag and, using a rolling pin, crush them to fine crumbs. Line an 8-inch round cake pan with enough plastic wrap to extend by 4 inches all around.

2. In a large bowl, using an electric mixer, beat the cream cheese at high speed until fluffy, about 3 minutes. Beat in the chocolate syrup and 1/4 cup of water and beat the chocolate cream for 2 minutes.

3. Arrange 9 cookies in an overlapping ring on the bottom of the prepared cake pan and place 1 cookie in the center. Spoon one-fourth of the chocolate cream (about 1 1/4 cups) over the cookies, being careful not to disturb them. Repeat with the remaining cookies and chocolate cream, ending with a layer of 10 cookies on top. Fold the plastic wrap over the top of the cake. Lightly tap the pan once or twice on a work surface. Refrigerate the cake for at least 8 hours and preferably overnight.

4. Peel back the plastic wrap and invert the cake onto a serving plate. Carefully peel off the plastic wrap. Press the cookie crumbs onto the side of the cake to coat evenly. Cut into wedges and serve.

Rosie Assoulin Resort 2015

Standard

Ahhhh! Can’t get enough of Rosie Assoulin. Check out her resort 2015 lookbook! Incredible!

Rosie-Assoulin-Resort-2015-Lookbook 5Rosie-Assoulin-Resort-2015-Lookbook 4Rosie-Assoulin-Resort-2015-Lookbook 3Rosie-Assoulin-Resort-2015-Lookbook 2Rosie-Assoulin-Resor-2015-Lookbook 1Rosie-Assoulin-Resort-2015-Lookbook 6

Credit: Style Pantry

Chocolate Sacher Torte

Standard

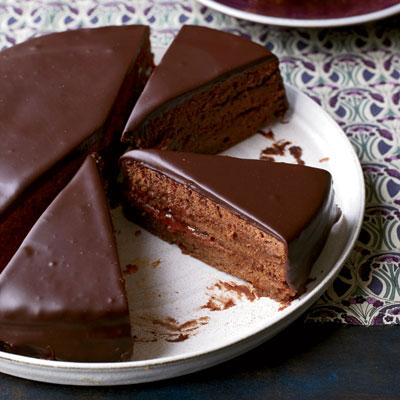
Sacher torte is a classic Austrian chocolate cake layered with apricot preserves. You can use the preserves three ways: for moistening the cake layers, as a thick filling between the layers, and as a glaze to seal the cake before covering it in chocolate. The cake is moist and luscious on its own, but it’s also delicious served the traditional way, with unsweetened whipped cream.

sacher-torte-recipe-fw0512-xl

Yields: one 9-inch torte
Total Time: 2 hr
Cook Time: 1 hr

Ingredients

6 large eggs, separated
1 cup(s) all-purpose flour
1/2 cup(s) (1/3 cup) almond flour or 2 ounces blanched almonds, ground
1/4 teaspoon(s) salt
1 1/2 stick(s) unsalted butter, softened
1 cup(s) sugar
5 ounce(s) bittersweet chocolate, melted and cooled slightly
1 3/4 cup(s) apricot preserves
2/3 cup(s) light corn syrup
2 tablespoon(s) rum
10 ounce(s) bittersweet chocolate, chopped
Unsweetened whipped cream, optional, for serving

Directions

1. Preheat the oven to 375 degrees F. Butter a 9-inch springform pan. Line the bottom of the pan with parchment paper and butter the paper. Dust the pan with flour, tapping out the excess.

2. In a large bowl, using a handheld electric mixer, whip the egg whites at high speed until soft peaks form.

3. In a small bowl, whisk the all-purpose flour with the almond flour and salt. In another large bowl, beat the butter and sugar until fluffy. Add the yolks, one at a time, and beat until fluffy. Beat in the chocolate, then beat in one-fourth of the whites. Using a spatula, fold in the rest of the whites until no streaks remain.

4. Scrape the batter into the prepared pan and smooth the top. Bake the cake in the center of the oven for 35 to 40 minutes, until a toothpick inserted in the center comes out with a few moist crumbs attached. Let the cake cool on a wire rack for 30 minutes, then remove the ring and let the cake cool completely. Invert the cake onto a plate and peel off the parchment. Turn the cake right side up. Using a long serrated knife, cut the cake horizontally into 3 even layers.

5. In a small microwave-safe bowl, whisk 1/4 cup plus 2 tablespoons of the apricot preserves with 1/4 cup of water and microwave until melted.

6. Set the bottom of the springform pan on a wire rack and set the rack on a baking sheet. Arrange the top cake layer, cut side up, on the springform pan.
Brush the cake with one-third of the melted apricot preserves. Spread 1/2 cup of the unmelted apricot preserves on top and cover with the middle cake layer. Brush the surface with another third of the melted preserves and spread another 1/2 cup of the unmelted preserves on top. Brush the cut side of the final layer with the remaining melted preserves and set it cut side down on the cake. Using a serrated knife, trim the cake edges if necessary to even them out.

7. In the microwave-safe bowl, microwave the remaining 1/4 cup plus 2 tablespoons of the apricot preserves until melted, about 30 seconds. Press the preserves through a strainer to remove the solids. Brush the preserves all over the cake until completely coated. Refrigerate for 20 minutes until set.

8. Meanwhile, in a medium saucepan, whisk the corn syrup with the rum and 2 tablespoons of water and bring to a boil. Cook until slightly thickened, about 1 minute. Put the chocolate into a heatproof bowl and pour the hot mixture on top. Let stand until melted, then whisk until smooth. If the chocolate glaze is too thick to pour, whisk in another tablespoon of hot water. Let cool to warm.

9. Using an offset spatula, scrape off any excess preserves from the cake so that it is lightly coated. Slowly pour half of the warm chocolate glaze in the center of the cake, allowing it to gently coat the top and spread down the side. Spread the glaze to evenly coat the torte. Microwave the remaining glaze for a few seconds and repeat pouring and spreading. Scrape up any excess glaze. Refrigerate for at least 10 minutes to set the glaze, then cut the torte into wedges and serve with the whipped cream.

Sunday Reflections

Image

2 Corinthians 12_9

Off The Chain Performance – Christina Aguilera

Standard

Aretha Franklin tribute by Christina Aguilera, Jennifer Hudson, Florence Welch, Yolonda Adams, Martina McBride Live From The 53rd Annual Grammy Awards 2011. I love them all, but Christina kills it!!

Happiness Is…

Standard

Happy Friday!!

Happiness is when what you say, think, do are in harmony

Dsquared2 Resort 2015 Collection

Standard

#FashionfriendsofTenaciousM… Gorgeous capsule collection from Dsquared2 for resort 2015. Love!

dsquared-01dsquared-02dsquared-06dsquared-05dsquared-03dsquared-04

Credit: Style Pantry

The History of Juneteenth

Standard

June 19th, 1865 marks the date that American slavery was effectively outlawed in U.S. territories. Two years after Lincoln issued the Emancipation Proclamation, Union soldiers arrived in Galveston Texas with news that all slaves were free, and with resources to enforce said freedom.

tJune 19the

Credit: HuffPost Black Voices

Dark Chocolate-Olive Oil Cake

Standard

Full of rich, deeply chocolate flavor, you’d never guess it’s the olive oil that gives this cake such moistness and character. You can use a stencil design to dust the cake with confectioners’ sugar, or if you have a favorite chocolate frosting, feel free to use it here. Be sure your 8-inch cake pan is at least 2 inches high; the batter almost fills it. The cake keeps at room temperature for up to four days, but it will disappear much sooner than that.

Dark Chocolate-Olive Oil Cake

Serves 8 to 10

Ingredients

Olive oil and flour for the pan
1-1/4 oz. (1/2 cup) Dutch-processed cocoa powder (I use Droste)
1 tsp. vanilla extract
1/2 tsp. almond extract
4-1/2 oz. (1 cup) all-purpose flour
1/4 tsp. salt
1/4 tsp. baking soda
3 large eggs plus 1 egg yolk, at room temperature
2/3 cup olive oil
1-1/3 cups sugar
1/4 cup confectioners’ sugar for dusting

Preparation

1. Position a rack in the middle of the oven. Heat the oven to 325°F. Generously oil an 8×2-inch round cake pan (or an 8-1/2-inch springform pan) with olive oil and line the bottom of the pan with parchment or waxed paper. Oil the paper and dust it lightly with flour.

2. In a small saucepan, boil about 1/2 cup of water. Meanwhile, sift the cocoa powder through a strainer over a small bowl. Stir 6 Tbs. of the boiling water into the cocoa until it’s smooth and glossy (if the mixture is very thick, you can add as much as 2 Tbs. more boiling water; when I tried this cake with Hershey’s cocoa, I needed to do this). Stir in the vanilla and almond extracts. Set aside to cool slightly. In another small bowl, mix together the flour, salt, and baking soda and set aside.

3. In the bowl of a stand mixer, combine the eggs and yolk, olive oil, and sugar. Using the whisk attachment, beat on medium-high speed until thick, lemon colored, and creamy, 2 to 3 minutes, scraping down the sides of the bowl. Reduce the speed to low and gradually add the warm (not hot) cocoa mixture until it’s well combined, scraping down the sides of the bowl once. Gradually mix in the dry ingredients until just combined, scraping down the sides of the bowl.

4. Pour the batter into the prepared cake pan and bake in the center of the oven until a toothpick comes out with a few moist crumbs clinging to it but with no wet batter, 55 to 60 minutes. Put the pan on a rack and carefully run a paring knife around the inside edge to release the cake. Let cool for 10 minutes. Using a second rack to sandwich the cake pan, flip the pan over. Carefully lift the pan from the cake, gently peel off and discard the paper liner, and let the cake cool completely.

5. Before serving, dust the top of the cake with confectioners’ sugar. To use a stencil pattern, use the flat side of the cake for a more level surface (the cake may dip slightly in the center; if that’s the case, you’ll get a cleaner design with a pattern that keeps close to the perimeter).