Tag Archives: Chocolate

Chocolate Chip Graham Cracker Snacking Cake

Standard

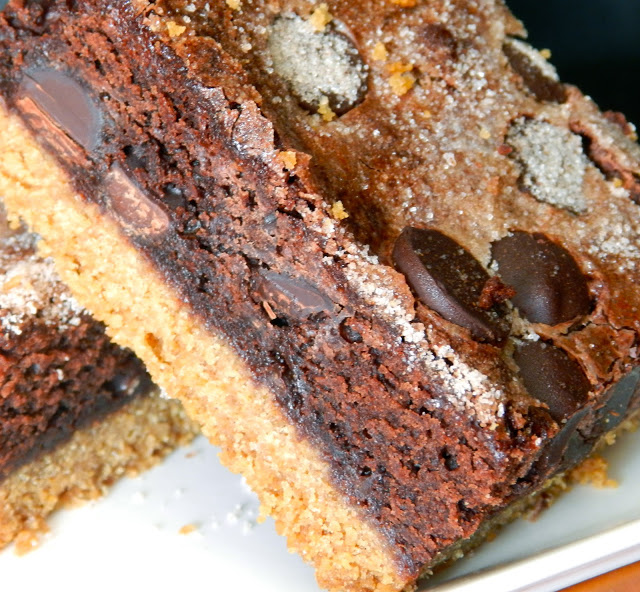
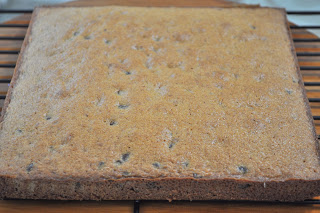
This is an easy cake to make. This is not a high-rising cake at all. After spreading the batter out in the pan it is only abut 1 to 2 inches high, and it will not rise much more during baking. Don’t worry about this because it is a snacking cake, not a layer cake, and it comes out just fine.

Chocolate Chip Graham Cracker Snacking Cake

Ingredients – Cake

8 whole graham crackers, finely ground (about 1 cup)
¼ cup unbleached all purpose flour
1 tsp baking powder
½ tsp salt
6 tbsp (¾ stick) butter, softened
¼ cup sugar
1 egg
1 egg yolk
1 tsp vanilla extract
¼ cup milk
½ cup semisweet chocolate chips (I used mini choc chips)

Ingredients – Frosting

½ cup (1 stick) unsalted butter, softened
½ cup confectioners sugar
½ tsp vanilla extract
½ cup marshmallow fluff

Preparation – Cake

1. Preheat the oven to 350°F.
2. Grease an 8 inch square baking pan and dust it with flour, knocking out any extra (or use baking paper like I did).
3. Combine the graham cracker crumbs, flour, baking powder and salt in a medium mixing bowl.
4. Combine the butter and sugar in a large mixing bowl and cream with an electric mixer on medium-high speed until fluffy, about 3 minutes, scraping down the sides of the bowl as necessary. With the mixer on low speed, add the egg, egg yolk and vanilla. Scrape down the sides of the bowl and then beat until smooth. With the mixer on low speed, add a third of the flour mixture, then half of the milk, stirring until combined. Repeat with the remaining flour and milk, ending with the flour.
5. Stir in the chocolate chips. Scrape the batter into the prepared pan and smooth the top with a rubber spatula.
6. Bake until a toothpick inserted in the center comes out clean, about 35 minutes.
7. Let the cake cool in the pan for about 10 minutes.
8. Invert it onto a wire rack, and then turn it right side up to cool completely.

Graham Cracker Chocolate Chip Snacking Cake 2

Preparation – Frosting

1. Place the butter in a medium mixing bowl and beat until creamy.
2. With the mixer on low speed, slowly add the sugar, scraping down the sides of the bowl as necessary. Stir in the vanilla and the marshmallow fluff and beat until smooth.
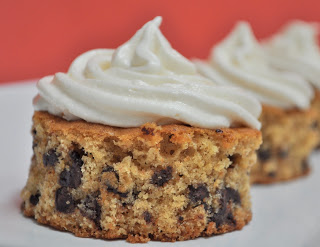
3. Use immediately or cover the bowl with plastic wrap and keep in the fridge for up to 3 days. Cut the cake into squares and serve each one with a dollop of frosting on top. (Bring the frosting back to room temperature first if it has been stored in the fridge).
4. Store any uneaten cake in an airtight container for up to 3 days.
5. Makes one 8 inch square cake.

Nutella Buttercream Chocolate Cake

Standard

Here is a fun recipe. Use a knife to cut the wafer cookies in half before adhering them with buttercream to the side of the cake. One last tip – maybe think twice about decorating with finely grated white chocolate on the top of the cake. I thought this would be a nice touch but I think it ended up looking like shredded cheese. Still tastes great!

Nutella Buttercream Chocolate Cake 1Nutella Buttercream Chocolate Cake

Ingredients – Cake
1 package (18.25oz) devil’s food cake mix with pudding
1 cup sour cream
3/4 cup water
1/2 cup vegetable oil
3 large eggs
1 teaspoon vanilla
3/4 cup Nutella

Ingredients – Frosting

1/2 cup semisweet chocolate chips
1 cup butter, softened to room temperature
1 small jar Nutella
4 cups sifted powdered sugar
1/4 cup dark cocoa powder
1/4 cup whole milk
2 teaspoons vanilla extract
About 60 4-inch Pirouette Wafer Cookies, preferably Pepperidge Farm brand (2 cans, optional)

Preparation – Cake

1. Place a rack in the center of the oven and preheat the oven to 350 degrees F. Generously grease two 9-inch round cake pans with solid vegetable shortening, then dust with flour. Shake out the excess flour. Set the pans aside.
2. Place the cake mix, sour cream, water, oil, eggs, Nutella, and vanilla in a large mixing bowl.
3. Blend with an electric mixer on low speed for 1 minute. Stop the machine and scrape down the sides of the bowl with a rubber spatula. Increase the mixer speed to medium and beat 2 minutes more, scraping down the sides again if needed. The batter should look well combined.
4. Divide the batter between the prepared pans, smoothing it out with the rubber spatula. Place the pans in the oven side by side.
5. Bake the cakes until they spring back when lightly pressed with your finger, 28 to 32 minutes. Remove the pans from the oven and place them on wire racks to cool for 10 minutes.
6. Run a dinner knife around the edge of each layer and invert each onto a rack, then invert again onto another rack so that the cakes are right side up.
7. Allow to cool completely, 30 minutes more.

Preparation – Frosting

1. Place the chocolate chips in the microwave on high for about 90 seconds, stopping to stir every 20-30 seconds. Stir until completely melted and smooth. Set aside.
2. Beat the butter and Nutella on medium-high speed until creamy. Beat in the melted chocolate chips.
3. Add the powdered sugar one cup at a time.
4. Beat in the cocoa, milk, and vanilla until smooth.
5. Once the cakes are cool frost cake and decorate with Pirouette Wafer Cookies.

White Chocolate & Cranberry Crispy Treats

Standard

It has been a crazy few weeks in the world of TenaciousM! And my #chocolatefriendsofTenaciousM have suffered and let me know about it. To them I say: “My bad, and I back!”

Is there a better pairing than sweet, juicy berries and rich, luscious chocolate? I don’t think so. Since I had already offered a few milk and dark chocolate sweets this month I decided to use white chocolate. I also wanted to make a bar cookie, just for something different. After looking through my collection of cookie magazines for something suitable to the theme, I chose a recipe from a Better Homes & Gardens magazines – White Chocolate & Cranberry Crispy Treats.

Little did I know I would be learning something new along the way about white chocolate. Technically white chocolate is not really chocolate at all because it does not contain any cocoa solids/chocolate liquor (which I did know). It is usually made from cocoa butter, milk solids, milk fat, sugar, vanilla, and salt. But anything that calls itself chocolate is my friend! Enjoy!!

White Choc-Cran Crispy 4

Ingredients

Crispy Treats ~
¼ cup butter
5 cups mini marshmallows
½ teaspoon ground cinnamon
6 cups crispy rice cereal
1 cup white baking pieces
1 cup dried cranberries
½ cup finely chopped pecans, toasted

Marshmallow Topping ~
1 tablespoon butter
1½ cups mini marshmallows

Preparation

Crispy Treats ~
1. Lightly grease a 9×13 baking pan; set aside.
2. In a 4- to 5-quart saucepan, melt butter over low heat.
3. Add marshmallows, stirring until melted, then stir in cinnamon.
4. Add crispy rice cereal, white baking pieces, and dried cranberries, stirring until combined.
5. Scoop mixture into prepared pan. With the back of a greased spoon (or hands), press mixture evenly into pan.
6. If desired, drizzle with Marshmallow Topping.
7. Let stand for 1 hour before serving.
8. Cut into bars (makes approximately 48 bars).

Marshmallow Topping ~
1. In a medium saucepan, melt butter over low heat.
2. Add marshmallows, stirring until melted.
3. Drizzle over crispy treats if desired.

Mexican Chocolate Crunch Brownies

Standard

The brownies will be a huge success! Although they are made with a box brownie mix, you could use your own recipe to top the crunchy base.

Mexican Chocolate Crunch Brownies

Makes: 24 brownies

Ingredients

1 box (12.8 oz) Cinnamon Toast Crunch cereal (about 8 cups)
½ cup butter, melted
1 box Fudge Brownie mix
½ cup vegetable oil
¼ cup water
2 eggs
½ teaspoon ground cinnamon
1⅓ cups semisweet chocolate chips
3 tablespoons tablespoons sugar
½ teaspoon ground cinnamon

Preparation

1. Heat oven to 350℉.
2. Spray 13×9-inch pan with cooking spray.
3. In a small bowl mix together the sugar and cinnamon, and set aside until needed.
4. Place cereal in food processor bowl with metal blade (do in 2 batches if necessary). Cover; process until finely crushed (or place cereal in large resealable food-storage plastic bag and crush with rolling pin).
5. Add butter to food processor and pulse until well blended. Press evenly in pan.
6. In large bowl, make brownie mix as directed on box, using oil, water and eggs and adding cinnamon. Stir in 2/3 cup of the chocolate chips. Pour brownie batter over cereal mixture.
7. Sprinkle remaining 2/3 cup chocolate chips evenly over batter.
8. Bake 20 minutes, then sprinkle the cinnamon-sugar evenly over brownies.
9.Bake 14 to 18 minutes longer or until brownies are set when lightly touched in center.
10. Cool 10 minutes; loosen edges but do not cut.
11. Cool completely, about 2 hours.

White Chocolate Latte Cookies

Standard

Sharing Chocolate!

Poppy's avatarBunny Kitchen

DSCN0136

So I am packed and ready to begin my epic USA vegan adventure, in just a few hours. I will be posting on facebook, twitter and instagram so that you can follow my adventures with some incredible vegan bloggers, recipe testers, facebookers, instagrammers and so on. If you don’t already, get following at the links above or at the end of this post or on the right hand side of the page to keep up with all the fun! What a way to celebrate the end of another Uni year!

View original post 327 more words

Espresso Cake with Hot Kahlua Syrup

Standard

Espresso Cake with Hot Kahlua Syrup. Doesn’t just reading the title of the cake sound amazing? I knew that chocolate and coffee were a good match, but never realized this about lemon. It is that little hint of lemon that really makes this cake special.

The method for creaming the butter and sugar for this cake is a little time consuming, but the end result of a beautiful light crumb will be worth it. Other than that, the cake is very straightforward to put together and the syrup is a breeze – and it is kind of fun to poke the small holes and pour the syrup over the top, knowing that the cake is going to be moist.

Espresso Cake 4Espresso Cake 5

Ingredients

Cake ~

3 tablespoons instant espresso
¼ cup boiling water
¼ cup cold water
2¼ cups sifted cake flour
1 tablespoon unsweetened cocoa powder
1 teaspoon baking soda
½ teaspoon salt
½ cup (1 stick) butter
½ teaspoon freshly grated
lemon zest
1½ cups superfine or strained sugar
3 large eggs
1 teaspoon vanilla extract
½ cup sour cream

Kahlua syrup ~

⅔ cup Kahlua or Tia Maria liqueur
⅓ cup water
3 tablespoons honey

Preparation

Cake ~

1. Position rack in lower third of the oven and preheat to 350℉.
2. Spray a 10-cup bundt pan with baking spray.
3. In a small bowl, dissolve the espresso in boiling water. Stir in the cold water and set aside to cool.
4. Using a triple sifter, sift together the flour, cocoa, baking soda, and salt. [If you do not have a triple sifter, sift the dry ingredients together three times.] Set aside.
5. Cut the butter into 1-inch pieces and put them and the lemon rind [zest] in the large bowl of an electric mixer fitted with beaters of paddle attachment. Soften on low speed, then increase speed to medium-high and cream until smooth and light in color, about 1½ to 2 minutes.
6. Add the sugar, 1 tablespoon at a time, taking about 6 to 8 minutes to blend it in well. Scrape the sides of the bowl occasionally.
7. Add the eggs, 1 at a time a 1-minute intervals. Blend in the vanilla and sour cream. The mixture will look somewhat curdled at this point. This is okay.
8. Reduce mixer speed to medium-low. Add the dry ingredients alternating with the espresso, dividing the dry ingredients into three parts and the espresso into two parts, starting and ending with the flour. Mix just until incorporated after each addition. Scrape the sides of the bowl and mix for 10 seconds longer.
9. Pour the batter into the prepared pan and smooth the surface with the back of a tablespoon. Center the pan on the rack and bake in the preheated oven for 55 to 65 minutes, or until the cake begins to come away from the sides of the pan and a twig of straw or a toothpick inserted into the center comes out dry.
10. Remove from the oven. Set the pan on a cake rack for 10 to 15 minutes to cool slightly.

Kahlua syrup ~

1. In a small saucepan blend the Kahlua, water, and honey. Bring to a slow boil and simmer 2 to 3 minutes.
2. Remove from heat.
3. Pierce the top of the cake with a wooden skewer and slowly spoon the hot syrup over the top of the hot cake.
4. Let stand in the pan for at least 1 hour to allow cake to absorb all the liqueur, then invert onto a rack and remove pan.
5. Store at room temperature under a glass dome or in an airtight container for up to 7 days.

Chunky Chocolate Scookies

Standard

Scookie – a cross between a scone and a cookie – so that is what they are called. They are delicious on their own, but become decadent when you dip them in ganache.

Chocolate Scookies

Makes about 36 cookies

Ingredients

½ cup plus 3 tablespoons butter, softened
⅔ cup granulated sugar
⅔ cup brown sugar
1 teaspoon vanilla extract
2 eggs
2 bananas, cut into chunks
3 cups all purpose flour
1 cup 5-grain cereal
2 teaspoons baking soda
½ teaspoon salt
1 cup white chocolate chips
1 cup macadamia nuts, roughly chopped
1 cup desiccated coconut
1½ tablespoons golden flax seeds

Chocolate Scookies 2

Preparation

1. Preheat the oven to 350°F.
2. Line sheet pans with parchment paper or Silpats.
3. Using a stand or hand-held mixer, cream together the butter and sugars until light and fluffy.
4. Add the vanilla and eggs and mix an additional 2 to 3 minutes until well combined.
5. Add banana and mix until roughly broken up.
6. In a separate bowl combine the flour, 5-grain cereal, baking soda, salt, white chocolate, macadamias, coconut, and flax seed.
7. On low speed, slowly add the flour mixture to the butter mixture and mix until the dry ingredients are completely incorporated and the dough is evenly mixed.
8. Place the dough in the refrigerator overnight, or at least 3 to 4 hours before baking.
9. Using an medium cookie scoop drop rounded tablespoons of dough onto the prepared sheets, spacing them about 2 inches apart.
10. Slightly flatten each cookie with the palm of your hand.
11. Bake 20-25 minutes or until golden around the edges and slightly soft in the center.
12. Cool the cookies on the baking sheet for about 20 minutes, before transferring them to a wire wrack to cool completely.
13. Once cooled dip half of each cookie in ganache, if desired.

Chocolate-Ricotta Icebox Cake

Standard

Preparing this mouthwatering chocolate cake takes only 30 minutes and you can make it up to two days ahead. Enjoy!

Chocolate-Ricotta Icebox Cake

PREP: 30 MINS TOTAL TIME: 6 HOURS 30 MINS
SERVINGS:10

INGREDIENTS

Nonstick cooking spray
14 ounces semisweet chocolate (do not use chips)
2 containers (15 ounces each) part-skim ricotta cheese, room temperature
3/4 cup heavy cream
1 package (9 ounces) chocolate wafers (about 44 cookies)

DIRECTIONS

STEP 1
Prepare pan: Remove sides from a 9-inch round springform pan (see note, below). Place a sheet of waxed paper over bottom, leaving an overhang; lock sides onto bottom, firmly securing paper. Spray inside of pan with cooking spray; line sides with a strip of waxed paper 28 inches long and 4 inches wide.

STEP 2
Make chocolate-ricotta mixture: Break 12 ounces of chocolate into pieces. Place in a heatproof medium bowl set over, not in, a pan of simmering water. Cook, stirring occasionally, until chocolate has melted, 8 to 10 minutes.

STEP 3
In a food processor, blend ricotta until very smooth, about 1 minute, scraping down sides of bowl. Add warm chocolate; blend until smooth. In a large bowl, beat cream until stiff peaks form. With a rubber spatula, gently fold in chocolate-ricotta mixture.

STEP 4
Assemble cake: Arrange half the cookies in an overlapping pattern to cover bottom of pan. Spoon half the chocolate-ricotta mixture on top of cookies; smooth top. Cover with remaining cookies; top with remaining chocolate-ricotta mixture, and smooth top. Cover with plastic wrap; refrigerate at least 6 hours and up to 2 days.

STEP 5
Before serving, release sides of pan and remove waxed paper from sides. Using bottom piece of waxed paper, pull cake onto a platter; with a metal spatula, lift cake and remove waxed paper. Using a vegetable peeler, shave remaining 2 ounces chocolate over top of cake. With a knife dipped in hot water, cut cake into 10 slices (wipe off knife, and dip in hot water after each slice).

Salted-Caramel Six-Layer Chocolate Cake

Standard

Yes, you read that right: six decadent layers of salted caramel and chocolate. Dive in!

salted-caramel-chocolate-cake-mld107719_vert (1)

PREP: 45 MINS TOTAL TIME: 3 HOURS 20 MINS SERVINGS: 12

INGREDIENTS

FOR THE CAKE
Unsalted butter, room temperature, for pans
3 cups all-purpose flour, plus more for pans
3 cups granulated sugar
1 1/2 cups unsweetened Dutch-process cocoa powder
1 tablepoon baking soda
1 1/2 teaspoons baking powder
Coarse salt
4 large eggs
1 1/2 cups low-fat buttermilk
1/2 cup plus 2 tablespoons safflower oil
2 teaspoons pure vanilla extract

FOR THE CARAMEL
4 cups granulated sugar
1/4 cup light corn syrup
2 cups heavy cream
Coarse salt
2 sticks cold unsalted butter, cut into tablespoons

FOR THE FROSTING
1/4 cup plus 2 tablespoons Dutch-process cocoa powder
2 sticks unsalted butter, room temperature
1/2 cup confectioners’ sugar
Coarse salt
1 pound semisweet chocolate, chopped, melted, and cooled
Garnish: flaked sea salt, such as Maldon

DIRECTIONS

STEP 1
Preheat oven to 350 degrees. Make the cake: Butter three 9-inch round cake pans, and dust with flour, tapping out excess. Sift flour, granulated sugar, cocoa, baking soda, baking powder, and 1 1/2 teaspoons coarse salt into the bowl of a mixer. Beat on low speed until just combined. Raise speed to medium, and add eggs, buttermilk, 1 1/2 cups warm water, oil, and vanilla. Beat until smooth, about 3 minutes.

STEP 2
Divide batter among pans. Bake until cakes are set and a toothpick inserted into the center of each comes out clean, about 35 minutes. Let cool in pans set on a wire rack for 15 minutes. Turn out cakes onto racks, and let cool completely.

STEP 3
Make the caramel: Combine granulated sugar, corn syrup, and 1/4 cup water in a medium saucepan over high heat. Cook, without stirring, until mixture is dark amber, about 14 minutes. Remove from heat, and carefully pour in cream (mixture will spatter); stir until smooth. Return to heat, and cook until a candy thermometer reaches 238 degrees, about 2 minutes. Pour caramel into a medium bowl, stir in 1 teaspoon coarse salt, and let cool slightly, about 15 minutes. Stir in butter, 1 tablespoon at a time. Let cool completely.

STEP 4
Meanwhile, make the frosting: Whisk together cocoa and 1/4 cup plus 2 tablespoons warm water in a bowl until cocoa dissolves. Beat butter, confectioners’ sugar, and a generous pinch of coarse salt in a clean bowl with a mixer on medium speed until pale and fluffy. Gradually beat in melted chocolate and then cocoa mixture until combined. Let stand for 30 minutes before using.

STEP 5
Trim tops of cakes using a serrated knife to create a level surface. Cut each in half horizontally to form 2 layers. Transfer 1 layer to a serving platter, and spread 3/4 cup caramel over top. Top with another cake layer, and repeat with remaining caramel and cake layers, leaving top uncovered. Refrigerate until set, about 1 hour.

STEP 6
Frost top and sides of cake in a swirling motion. Sprinkle with sea salt.

CHOCOLATE PEANUT BUTTER BANANA SNACK BREAD

Standard

This recipe is just one bowl with everyday, simple ingredients and is both vegan and gluten free! But, it’s infused with creamy, salty peanut butter and chocolate in the form of cocoa powder and dairy-free chocolate chips!

Chocolate-Peanut-Butter-Banana-Snack-Bread-vegan-glutenfree-and-One-Bowl_1

PREP TIME: 15 mins COOK TIME: 1 hour TOTAL TIME: 1 hour 15 mins

Serves: 10

INGREDIENTS

1 flax egg ( 1 Tbsp flaxseed meal + 2.5 Tbsp water | or sub 1 egg)
3 medium ripe bananas (~1.5 cups)
3.5 tsp baking powder
pinch sea salt
1/3 cup salted natural peanut butter (creamy or crunchy)
2.5 Tbsp grape seed or coconut oil, melted
scant 1/4 cup organic cane sugar
1/4 cup packed light brown sugar
2-3 Tbsp agave or maple syrup, depending on ripeness of bananas
3/4 cup unsweetened almond or other non-dairy milk
1 1/4 cup almond meal
1/2 cup unsweetened cocoa powder
1 cup gluten free flour blend (my go-to blend, or I recommend Trader Joe’s all purpose GF blend)
1 cup gluten free oats
1/4 cup dairy-free chocolate chips
OPTIONAL: 1/4 cup Peanut Butter Chips

INSTRUCTIONS

1. Preheat oven to 350 and line a loaf pan with parchment paper or spray with nonstick spray.

2. Prepare flax egg in a large mixing bowl and let rest for 5 minutes to activate.

3. Add banana and mash thoroughly.

4. Add all ingredients through almond milk and whisk vigorously to combine.

5. Add cocoa powder, almond meal, gluten free flour blend, oats and stir.

6. Last, stir in chocolate and peanut butter chips (if using).

7. Pour into loaf pan and bake for 1 hour – 1 hour 15 minutes. When ready, it should feel firm and be crackly on top. My sweet spot was about 1 hour 5 minutes.

8. Let cool completely before cutting or it will be too tender to hold form (preferably overnight).

9. Store completely cooled leftovers in a covered container for up to several days, though best when fresh. Slice and freeze for longer term storage.