Tag Archives: Entertaining

Chocolate Cake with Cream Cheese Frosting

Standard

A TenaciousM Dream Treat! Enjoy!!

10644973_836650163127262_5263225169562065384_n

Ingredients

1/3 cup flour (85 g)
4 Tbsp unsweetened cocoa powder
1/4 tsp baking powder
1/4 tsp baking soda
1 pinch salt
1/3 cup sugar (add up to 1/2 cup for sweeter cake)
1 egg
4 Tbsp butter (60 g)
3/4 tsp vanilla
1/2 cup milk (120 ml)
** Cream Cheese Frosting **
100 g cream cheese (3.5 oz)
3 Tbsp butter (45 g)
10 drops vanilla
8 Tbsp powdered sugar (60 g)
Coconut flakes or sprinkles (optional)

Directions

1. Let the egg and butter sit out at room temperature for 30 minutes. Preheat oven to 180C/350F. Put in a large bowl and beat/cream with a fork or mixer until creamy, soft and a little fluffy.

2. Add the sugar (I used natural sugar so it looks brown here) a little at a time and mix well.

3. Add egg and vanilla. Continue to beat until well mixed.

4. In a separate bowl, mix together the flour, cocoa powder, baking soda, baking powder, and salt. Gradually mix the flour mixture and the milk into the butter and egg mixture. Beat until smooth.

5. Grease well a 8-inch (20.5-21 cm) pie dish or cake pan with oil or butter. Pour in the batter and spread out evenly.

6. Bake in the oven for 30 minutes. Check the center with a toothpick – if it comes out clean it’s done! Let cool on a rack for 10 minutes. Remove and let cool completely before frosting, about 1 hour.

7. While the cake is cooking prepare the icing. Let the cream cheese and butter soften a little at room temperature. Put in a bowl and beat/cream until smooth.

8. Gradually mix in the powdered sugar.

9. When the icing becomes soft enough to spread, it’s done! Store the fridge until the cake has cooled.

When the cake is completely cooled, you can spread on the icing! If the icing hardened a little in fridge, let it warm up a few minutes until you can spread it.

Finish up by sprinkling some coconut flakes or sprinkles. Slice and serve!!

Chocolate Clementine Cake with Hot Chocolate Sauce

Standard

This cake can be made a day in advance. The Hot Chocolate Sauce can be stored, covered, in refrigerator up to 1 week; reheat over low heat until warmed through. Make both the cake and sauce with the best quality bittersweet chocolate you can find. Substitute semisweet chocolate if you wish.

chocolate-cake-ct-1585351-xl

Makes 12 to 16 servings

Ingredients

12 ounces bittersweet chocolate, chopped
1 cup butter, cut into pieces
7 large eggs, separated
1 cup sugar, divided
3/4 cup all-purpose flour
2 teaspoons grated clementine zest (about 2 clementines)*
2 medium clementines, peeled and coarsely chopped*
3 tablespoons orange liqueur**
1/4 teaspoon salt
Hot Chocolate Sauce
Garnish: sweetened whipped cream

Preparation

Prep: 30 Minutes
Cook: 50 Minutes
1. Preheat oven to 350°. Grease a 9-inch springform pan; line bottom with parchment paper. Grease and flour parchment, tapping out excess flour; set aside.

2. Stir together chocolate and butter in a heavy saucepan over low heat until smooth. Remove from heat.

3. Beat egg yolks and 3/4 cup sugar in a large bowl at medium speed with an electric mixer until pale and thick. Add melted chocolate mixture, beating until blended. Add flour, beating until blended, stopping to scrape down sides. Stir in zest, chopped clementines, and orange liqueur.

4. Beat egg whites in a separate bowl at medium-high speed with an electric mixer until foamy. Add salt and remaining 1/4 cup sugar, 1 tablespoon at a time, beating until stiff peaks form. Fold one-third egg white mixture into chocolate mixture; repeat twice. Pour mixture into prepared pan.

5. Bake at 350° for 50 to 55 minutes or until slightly firm to touch. (Cracks will form on top of cake.) Remove cake to a wire rack; run sharp knife around edge of pan to loosen. Cool slightly.

6. Remove sides of springform pan. Invert cake onto serving plate, and remove springform bottom and parchment paper. Serve warm with Hot Chocolate Sauce; garnish, if desired.

TenaciousM’s Favorite Chocolate Cheese Cake

Standard

I guess I have to say it. This cake is for major chocolate lovers and for good reason. Those chocolate cake layers PLUS the chocolate cheesecake layer PLUS the chocolate frosting PLUS the shavings on top. Dig out the vanilla ice cream to accompany slices of this! #chocolatefriendsofTenaciousM enjoy!!

Chocolate-Cheesecake-Cake-8

Ingredients

CHOCOLATE CHEESECAKE:
5 ounces bittersweet chocolate (70% cocoa), chopped
Two 8-ounce packages cream cheese, at room temperature
1/2 cup + 3 tablespoons granulated white sugar
2 tablespoons unsweetened cocoa powder
2 large eggs

CHOCOLATE CAKE:
1 3/4 cups all-purpose flour
1 1/2 cups granulated white sugar
2/3 cup unsweetened cocoa powder (not Dutch process)
1 1/2 teaspoons baking soda
1/2 teaspoon baking powder
1/2 teaspoon salt
1 teaspoon instant espresso powder
3 large eggs, at room temperature
1 1/4 cups buttermilk, divided
3/4 cup unsalted butter, at room temperature
1 teaspoon vanilla extract

CHOCOLATE SOUR CREAM FROSTING:
2 cups semisweet chocolate chips
1/2 cup (1 stick) unsalted butter, at room temperature
1 cup sour cream
2 tablespoons light (white or golden) corn syrup

Directions

1. Prepare the cheesecake layer: Preheat oven to 325 degrees F. Place a large roasting pan on the lower third rack of the oven. Place a kettle of water on the stove to boil. Spray a 9-inch springform pan with nonstick spray and line the bottom with a round of parchment paper. Wrap a double layer of foil around the bottom and up the sides of the pan (you want to seal it so the water from the water bath doesn’t seep into the pan). Place chocolate in a medium glass bowl. Melt in the microwave in 30 second bursts until the chocolate is melted and smooth, stirring after each burst. Set the chocolate aside and let it cool off until it is lukewarm but still pourable. In a large bowl, use an electric mixer to mix the cream cheese- blend until it is nice and smooth and creamy. Mix in sugar and cocoa powder and blend until incorporated, scraping down sides of the bowl as needed. Add eggs, one at a time, blending after each addition. Mix in the lukewarm chocolate. Mix until smooth. The batter will be very thick- scrape it into the prepared pan and smooth the top. Set the pan into the roasting pan in the pre-heated oven. Carefully pour the hot water from your kettle into the roasting pan (it will fill the pan surrounding the cheesecake). Pour enough water so that there is about an inch of water coming up the foil along the sides of the cheesecake pan. Bake the cheesecake for 45 minutes. It should be set to the touch and not jiggly. Remove the cheesecake from the roasting pan and let it cool on a wire rack for at least an hour. When it has cooled, place the pan into the freezer and let the cheesecake freeze completely. This can be done in several hours- or overnight.

2. Prepare the cake layers: Preheat oven to 350 degrees F. Grease and flour two 9-inch round metal baking pans (or spray with nonstick baking spray with flour). In a large bowl, whisk together flour, sugar, cocoa powder, baking soda, baking powder and salt. Add espresso powder, eggs, 1/4 cup of the buttermilk, butter and vanilla to the flour mixture. Using an electric mixer on medium-low speed, beat for 1 minute, until blended. Scrape sides and bottom of bowl with a rubber spatula. Beat on high speed for 2 minutes. Add the remaining buttermilk and beat on low speed for 15 to 30 seconds, until just blended. Spread the batter evenly into the prepared pans, dividing equally. Bake 30 to 35 minutes or until a toothpick inserted in the center comes out with a few moist crumbs attached. Let cool in pans on a wire rack for 10 minutes. Run a knife around the edge of the pans, then invert cakes onto a rack to cool completely.

3. Prepare the frosting: In a large microwave-safe bowl, combine the chocolate chips and butter. Microwave 1 to 2 minutes, stopping every 30 seconds to stir, until melted and smooth. Whisk the sour cream and corn syrup into the chocolate mixture until smooth. Cover and refrigerate for at least 30 minutes or until firm enough to spread.

4. Assemble the cake: Place one cake layer into the center of a cake plate or platter. Remove the cheesecake from the freezer, take off the sides of the pan, and slide a knife under the parchment to remove the cheesecake from the pan. Peel off the parchment. Measure your cheesecake layer against the cake layers. If the cheesecake layer turns out to be a slightly larger round than your cake, move it to a cutting board and gently shave off some of the exterior of the cheesecake (with a sharp knife) to get it to the same size as your cake layers. Place the cheesecake layer on top of the first cake layer. Place the 2nd cake layer on top of the cheesecake.

5. Frost the cake: Apply a crumb coat layer to the cake- use a long, thin spatula to cover the cake completely with a thin and even layer of frosting. Be sure to wipe off your spatula each time you are about to dip it back into the bowl to get more frosting (this way you won’t be transferring any crumbs into the bowl of frosting). Don’t worry at this point about the crumbs being visible in the frosting on the cake. When your cake has a thin layer of frosting all over it, place it into the refrigerator for 30 minutes to “set” the frosting. Once the first layer of frosting is set, apply the 2nd layer. Start by adding a large scoop of frosting onto the top of the cake. Use a long, thin spatula to spread the frosting evenly across the top and then spread it down the sides of the cake too. Because you applied a crumb-coat layer, you shouldn’t have any crumbs floating around in the final frosting layer. Decorate, as desired. I recommend white chocolate shavings (see *Tips below). Keep this cake refrigerated.

TIPS:

*Using a good quality bittersweet chocolate will make a difference in this recipe. Splurge for Scharffen Berger or something similar.
*For making white chocolate shavings: Purchase a hunk of white chocolate and a hunk of dark chocolate. Microwave the chocolate to soften it up slightly (15 to 30 seconds, depending on the size). Use a potato peeler to run down the side of the chocolate to create shards/shaves/curls of chocolate. I like to shave it onto a paper plater and then just use the plate to slide the chocolate onto the top of the cake.
*If you are serving this cake at a party, it’s perfectly okay to leave the cake at room temperature for an hour or so while serving. Otherwise, keep it refrigerated.

Hot Chocolate Fudge Pie

Standard


If you love chocolate, then this is for you. It is oh so gooey and delicious… #chocolatefriendsofTenaciousM, enjoy!

images

Ingredients

1 stick butter, softened
1 c sugar
2 eggs
1 tsp vanilla
3 Tbsp cocoa powder
1 tsp salt
1/2 c all purpose flour

Instructions

1. Preheat oven to 350 degrees.

2. Cream together butter and sugar with electric mixer until fluffy, about 3 minutes. Add eggs and vanilla and mix well. Add cocoa powder, salt and flour and stir until well combined. Grease 8 inch pie pan with butter or cooking spray, pour mixture into pie pan. Bake 30 to 35 minutes until center is set.

3. Hand mix to make it gooey, because if you use a mixer, it will have more of a brownie or cake texture, rather than “gooey”.

Chocolate Oreo Rice Krispie Treats

Standard

I make these in a 9×9 pan because I prefer a thicker square but any size pan will work! The better quality chocolate you use, the better these taste!

download

Ingredients

¼ cup butter
55 large marshmallows
6 cups crispy rice cereal
2 cups chopped Oreo cookies (plus extra for decorating)
4 oz milk chocolate

Instructions

1. In a large put melt butter & marshmallows over low heat until smooth & creamy. Remove from heat.

2. Combine marshmallow mixture and cereal and stir until cereal is coated. Fold in Oreos.

3. Place in a greased pan and refrigerate until completely cool.

4. Cut Krispies into squares. Melt chocolate in the microwave on 40% power until just about melted (stirring it will melt any pieces left without overheating). Dip one edge of the squares into the chocolate and place on parchment paper. Top with additional Oreos if desired.

5. Refrigerate to set.

Lavender-Honey Dark Chocolate Tart with a Cardamom-Lemon Crust (and Lavender-Honey Ice Cream with Cardamom-Almond Tuiles)

Standard

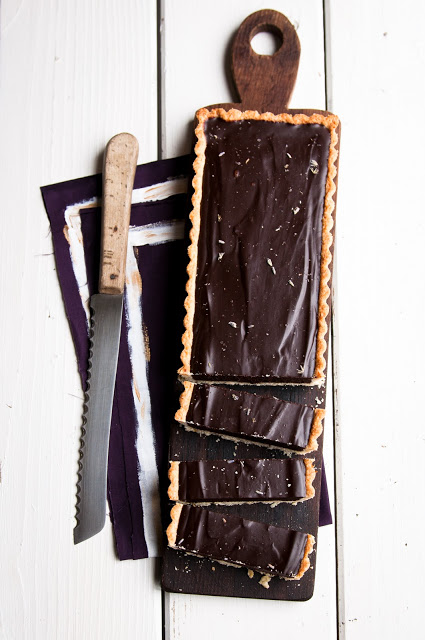
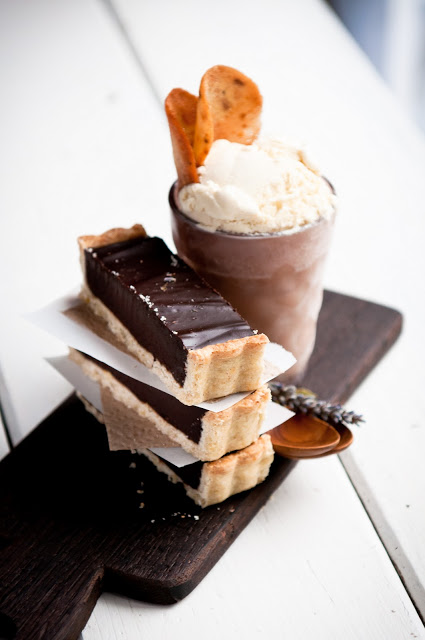
So here it is– the perfect dessert duo! A lavender-honey dark chocolate tart with a cardamom-lemon crust and lavender-honey ice cream with cardamom-almond tuiles. Yes, I know, the names of the desserts are quite a mouthful to say, but trust me, they’re quite a mouthful of yumminess to eat, too! 🙂

When making dessert duos or trios, I’m all about considering balance. And I really loved how this pair of desserts turned out. The spice of the cardamom and the floral scent of the lavender add a layer of interest to the tart, ice cream, and tuiles. And the bitter, deep dark chocolate of the tart goes so perfectly with the sweetness of the honey-flavored ice cream. You have the crunch of the tuiles against the smooth ice cream and the flakiness of the tart crust against the dense chocolate ganache as textural contrasts, and the lemons in the tart and almonds in the tuiles add a color of brightness and nuttiness to the overall dessert. Finally–and this is my favorite part–a generous sprinkling of coarse lavender sea salt over the dark chocolate tart will make your tastebuds unbelievably happy, I promise you.

lavendercardamom-10

Lavender Honey Ice Cream
(Makes ~one quart)

1/4 cup dried lavender flowers
1 1/2 cups whole milk
1/2 cup honey (I used wildflower)
1 1/2 cups heavy cream
5 large egg yolks
2 Tbspn sugar
pinch of salt

1. In a small saucepan with a tight-fitting lid, combine the lavender and milk. Bring to just a simmer, cover, and remove from heat. Let steep for at least ten minutes.
2. Stir together the honey and heavy cream in a bowl and prepare a fine mesh strainer on top. Set aside.
3. In a separate bowl, whisk together the egg yolks until light. Set aside.
4. Strain the lavender from the milk, making sure to press all of the liquid possible out of the lavender buds. Discard the lavender buds. Return the milk to the stove and add the sugar and salt. Bring to a bare simmer.
5. Whisking constantly, pour a small but steady stream of the heated milk into the egg yolks to temper. Do this slowly while whisking quickly. Once the milk and egg yolks are combined, return to the saucepan and to the stove.
6. Heat the egg yolk and milk mixture while stirring constantly, making sure to scrape the bottom of the pan so that nothing burns or sticks. Slowly cook the mixture until it thickens enough to coat the back of a spoon. Remove from heat immediately once it thickens.
7. Pour the hot creme anglaise through the strainer into the honey and cream. Stir to cool.
8. Chill the mixture thoroughly.
9. Freeze the ice cream bas in your ice cream maker of choice. (Here’s mine, which works like a dream, and I also have this one.)

lavendercardamom-16

Cardamom-Almond Tuile
(Makes ~30-50 cookies, depending on size)

1 1/2 oz sliced almonds
5 Tbspn unsalted butter, very soft
2 egg whites
1/8 tspn salt
1/3 cup + 1 Tbspn sugar
1/2 tspn ground cardamom
1/4 tspn vanilla
1/3 cup AP flour

1. Preheat the oven to 350 degrees F.
2. Bake the sliced almonds for 5-10 minutes until lightly toasted. Remove from the oven and chop very finely.
3. Prepare at least two baking sheets lined with silpats or non-stick parchment paper. (You may want to lightly grease the parchment paper, but you won’t need to grease the silpats.) Also have ready a very thin and wide spatula and a rolling pin (or something similar) over which to drape the tuiles while they cool.
4. In a bowl, whisk together the butter, egg whites, salt, sugar, cardamom, and vanilla until well combined. Add the finely chopped almonds and flour and mix until thoroughly combined.
5. Using an off-set spatula or the back of a spoon, spread very, very thin discs of batter onto the prepared baking sheets. Make sure to allow plenty of space between each tuile–they will spread.
6. Bake for 7-9 minutes, depending on the size of the tuiles, rotating the pan half-way through to facilitate even browning.
7. Remove from oven and immediately use the thin spatula to drape the tuiles over the prepared rolling pin. Let cool completely.

Note: Tuile batter may be made and stored, tightly-covered, in the refrigerator for a few days, if you’d like to make it ahead of time.
Note: Store tuiles in an airtight container if not using immediately. They are best used the day of.

Lavender-Honey-Cardamom-Lemon Dark Chocolate Tart
(Makes one 9″ round tart, or the equivalent rectangular or square sizes)

for pastry:
260 gr AP flour
1 (heaping) tspn ground cardamom
1 Tbspn freshly ground meyer lemon zest
1/4 cup sugar
7 Tbspn butter, cold and cut into pieces
1 egg yolk
1 Tbspn freshly squeezed lemon juice
2 Tbspn water, cold

1. Using a food processor or pastry cutter, mix the flour, cardamom, lemon zest, and sugar until combined. Cut the cold butter into the flour mixture until the size of small peas.
2. Add the egg yolk and gradually add the lemon juice and water just until a dough begins to form when you press it between two fingers. Do not overmix.
3. Form the pastry into a ball and refrigerate for at least one hour. (or stick it in the freezer for a shorter amount of time.)
4. Preheat the oven to 425 degrees F.
5. Remove the pastry dough from the fridge and press the dough into the tart pan. Prick the bottom of the dough all over with a fork, cover with parchment paper, and weigh down using dry beans or pie weights. Return to freezer for a few minutes if the dough has softened.
6. Bake for ~13-15 minutes until the edges just begin to turn golden. Remove the beans and parchment paper and continue to bake for 3-5 minutes more, until the crust has completely turned golden brown. Remove from oven and let cool.

for chocolate ganache filling:

10 oz. heavy cream
1/4 cup dried lavender buds
12 oz. dark chocolate, chopped
3 Tbspn honey
2 Tbspn butter
coarse salt
dried lavender buds

1. In a saucepan with a tight-fitting lid, heat the cream and lavender buds until just barely a simmer. Cover and remove from heat. Let steep for at least ten minutes.
2. Place the chocolate and honey in a heat-proof bowl, place a fine mesh strainer on top, and set aside.
3. Add the butter to the cream and lavender bud mixture and return to a simmer. Once the cream simmers, remove from heat and pour the hot cream through the sieve onto the prepared chocolate, making sure to press all of the liquid from the lavender buds. Discard the lavender buds. Let the chocolate sit for 2-3 minutes.
4. Whisk until the chocolate is completely melted and evenly distributed.
5. Immediately pour into the prepared tart crust.
6. Using your fingers (or a mortar and pestle), rub together an equal but small amount of coarse salt and dried lavender buds. Sprinkle liberally over the top of the chocolate. Let the tart set at room temperature until completely cool, about 1-2 hours. Serve at room temperature.

Triple-Chocolate Buttermilk Pound Cake

Standard

This is the best chocolate pound cake ever with deep rich flavor. And just in time for Thanksgiving.

triple-chocolate-buttermilk-pound-cake-sl

Ingredients

2 cups all-purpose flour
3/4 cup unsweetened cocoa
1/2 teaspoon baking powder
1 teaspoon table salt
1 1/2 cups butter, softened at room temperature
3 cups granulated sugar
5 large eggs, at room temperature
1 1/4 cups buttermilk
2 teaspoons instant espresso
2 teaspoons vanilla extract
1 cup 60% cacao bittersweet chocolate morsels
Shortening

CHOCOLATE GLAZE
3/4 cup semisweet chocolate morsels
3 tablespoons butter
1 tablespoon light corn syrup
1/2 teaspoon vanilla extract

BUTTERMILK GLAZE
1 cup powdered sugar
1 to 2 Tbsp. buttermilk
1/4 teaspoon vanilla extract

images

Directions

Hands-on: 45 Minutes
Total: 4 Hours, 25 Minutes

1. Prepare Cake: Preheat oven to 325°. Whisk together flour and next 3 ingredients. Beat 1 1/2 cups butter in a medium bowl at medium-high speed with an electric mixer until smooth. Gradually add granulated sugar, beating until light and fluffy. Add eggs, 1 at a time, beating just until yolk disappears. Combine 1 1/4 cups buttermilk and next 2 ingredients. Add flour mixture to egg mixture alternately with buttermilk mixture, beginning and ending with flour mixture. Beat at low speed after each addition. Fold in bittersweet chocolate morsels. Pour batter into a well-greased (with shortening) and floured 12-cup Bundt pan. Sharply tap pan on counter to remove air bubbles.

2. Bake at 325° for 1 hour and 15 minutes to 1 hour and 25 minutes or until a wooden pick inserted in center comes out clean. Cool in pan on a wire rack 20 minutes. Remove from pan; cool completely on rack.

3. Prepare Chocolate Glaze: Combine semisweet chocolate morsels, 3 Tbsp. butter, and 1 Tbsp. corn syrup in a microwave-safe glass bowl. Microwave at MEDIUM (50% power) 1 to 1 1/2 minutes or until morsels begin to melt, stirring after 1 minute. Stir until smooth. Stir in 1/2 tsp. vanilla.

4. Prepare Buttermilk Glaze: Whisk together powdered sugar, 1 Tbsp. buttermilk, and 1/4 tsp. vanilla in a small bowl until smooth. Add up to 1 Tbsp. buttermilk, if desired. Drizzle warm glazes over cooled cake.

Mini Triple-Chocolate Buttermilk Pound Cakes: Prepare recipe as directed through Step 1, pouring batter into 2 lightly greased (with vegetable cooking spray) 12-cup Bundt brownie pans, filling each about three-fourths full. Bake at 325° for 26 to 30 minutes. Cool in pans on wire racks 10 minutes; remove from pans, and cool completely. Proceed with recipe as directed in Steps 3 and 4. Makes 2 dozen. Hands-on 45 min.; Total 1 hour, 25 min.

Dark Chocolate Salted Caramel Oreo Pie

Standard


You guys, I cannot get over this pie. This is seriously one of the easiest, most impressive desserts ever. I mean, have mercy! Just look at it! It’s the perfect amount of decadence without being too rich or overpowering. And the best part is there are only FIVE ingredients. It’s so easy to make!

Dark-Chocolate-Salted-Caramel-Oreo-Pie-Recipe-02

There are three layers of decadent lusciousness here: The first is a bliss-inducing dark chocolate ganache, which tastes like the inside of an expensive French truffle. Second, a homemade, fool-proof salted caramel sauce you won’t have to worry about burning. And finally, an extra thick Oreo cookie crust. Because we all know the crust is the best part. Did I mention you only need 5 ingredients to make this? 🙂

Ingredients

Dark-Chocolate-Salted-Caramel-Oreo-Pie-Recipe-04

1 package (about 36) whole Oreos
1 cup (16 tablespoons) butter, divided
⅔ cup packed brown sugar
1¼ cup heavy whipping cream, divided
1 (12 oz) bag dark chocolate chips

Instructions

1. Finely crush the Oreos with a food processor or blender. Stir crumbs together with 8 tablespoons melted butter until well combined. Press into the bottom and sides of a pie pan. Freeze crust for 10 minutes until set.

2. Combine remaining 8 tablespoons butter and brown sugar in a small saucepan. Cook over medium heat, whisking constantly, until mixture begins to bubble. Continue cooking, whisking constantly, for 1 minute. Remove from heat. Slowly whisk in ¼ cup heavy whipping cream until smooth. Cool caramel about 15 minutes. Pour the caramel over the Oreo crust, then return to freezer for about 30-45 minutes until just chilled and set. (You don’t want the caramel to fully freeze.)

3. Place chocolate chips in a glass bowl. In a saucepan, bring 1 cup heavy whipping cream to a simmer over medium-high heat. Pour the cream over the chocolate chips and let sit for 5 minutes, then whisk until completely smooth. Pour the chocolate over the caramel and freeze for a final 30 minutes, until just chilled and set. OR refrigerate, covered, until ready to serve. Before serving, sprinkle the top with a flaky sea salt like kosher salt or Fleur De Sel.
Dark-Chocolate-Salted-Caramel-Oreo-Pie-Recipe-01

Peanut Chocolate Cake

Standard

Here’s a mouthwatering layer cake with peanut butter frosting. Two of my most favorite flavors together. It’s luscious!”

exps22361_TH10389D49

TOTAL TIME: Prep: 20 min. Bake: 35 min. + cooling MAKES: 12 servings

Ingredients

1/2 cup butter, softened
2-1/4 cups packed brown sugar
3 eggs
3 ounces unsweetened chocolate, melted and cooled
2 teaspoons vanilla extract
2-1/4 cups all-purpose flour
2 teaspoons baking soda
1/2 teaspoon salt
1 cup (8 ounces) sour cream
1 cup water

FROSTING:
1 cup butter, softened
1 cup peanut butter
4 cups confectioners’ sugar
1/4 cup milk
2 teaspoons vanilla extract
1 cup finely chopped peanuts

Directions

1. In a large bowl, cream butter and brown sugar until light and fluffy; beat in eggs, chocolate and vanilla. Combine the flour, baking soda and salt; add to creamed mixture alternately with the sour cream, beating well after each addition. Gradually beat in water.

2. Pour into two greased and floured 9-in. round baking pans. Bake at 350° for 35-40 minutes or until a toothpick inserted near the center comes out clean. Cool for 10 minutes before removing from pans to wire racks to cool completely.

3. For frosting, in a large bowl, cream the butter, peanut butter, confectioners’ sugar until light and fluffy. Beat in milk and vanilla until smooth; set aside.

4. Cut each cake horizontally into two layers. Place bottom layer on a serving plate; top with 1/2 cup frosting. Repeat layers twice. Top with remaining cake layer. Frost top and sides of cake with remaining frosting. Gently press peanuts into sides of cake. Yield: 12 servings.

Pecan Pie Brownies

Standard

Fudgy brownies and rich pecan pie filling bake together into one incredibly decadent dessert. Seriously though, this is one mashup where the final product is better than the sum of its parts. I’m not sure I can have another brownie or slice of pecan pie without thinking about how much better it is when they’re together.

15540684520_d3b2458a0f_o

Ingredients

For the brownies:
3/4 cup (170 grams) unsalted butter
7 ounces (200 grams) bittersweet chocolate, chopped or use chips
1 cup (200 grams) granulated sugar
3 large eggs
1 teaspoon vanilla extract
3/4 cup (90 grams) all-purpose flour
1/4 teaspoon ground cinnamon
1/4 teaspoon salt
For the pecan pie filling:
1/3 cup (108 grams) honey or light corn syrup
1/2 cup (105 grams) light or dark brown sugar
2 large eggs
1 teaspoon vanilla extract
1/4 cup (56 grams) unsalted butter, melted and cooled slightly
2 cups (225 grams) Diamond of California Pecan Halves

15106150073_f97407f8b2_o

Instructions

1. Preheat oven to 350 degrees F. Line a deep 9-inch cake pan (I used a springform pan) with greased foil or parchment paper.

2. In a medium saucepan set over medium low heat, melt the butter and chocolate together until melted and smooth, stirring frequently. Remove from heat and stir in the sugar. Add the eggs one at a time, mixing after each, followed by the vanilla extract. In a separate bowl, combine the flour, cinnamon and salt. Add to the chocolate mixture and mix just until no streaks of flour remain.

3. Spread batter into the prepared pan and bake for 20 minutes.

4. While the brownies are baking, prepare the pecan pie filling. Whisk together the honey or light corn syrup, brown sugar, eggs and vanilla. Slowly add the melted butter and mix until combined. Add the pecans and stir until they’ve all been coated in the filling.

5. After 20 minutes, remove the brownies from the oven and gently pour the pecan pie filling on top, using a knife to evenly distribute it over the brownie batter.

6. Bake for an additional 35-45 minutes until center jiggles slightly when gently shaken. Cool completely to room temperature, for at least 2 hours, to completely set the brownies. If desired, chill in the fridge for a shorter cooling time.