Tag Archives: For Chocolate Lovers

Crockpot Candy

Standard

This Crockpot Candy recipe is great for the holidays. I honestly had no idea it was so easy.

It’s 4 ingredients, the slow cooker does everything for you, and it’s delicious. And I’m not gonna lie, I can’t stop eating it! It is seriously addictive. I crave it all year long.

The recipe only calls for peanuts but you can use a mixture of peanuts and pecans. I stuck with only peanuts, my favorite. Also, I halved the batch and got a ton (as you can see from the picture below) so if you make a full batch, be ready to eat a lot of peanuts!

(PS. Almond bark is found in the baking aisle of your grocery store, close to all the baking chocolates. Or you can order it online.)

4194016246_17a8e33b3b_z

Ingredients

2 pound white almond bark
4 ounces German chocolate bar
12 ounce bag semisweet chocolate chips
24 ounces dry roasted peanuts

Instructions

Add all ingredients to slow cooker. Let cook on low for 1 hour without messing with it. After an hour, stir to combine everything. Allow to cook for another hour, stirring every 15 minutes.
Drop spoonfuls of the candy onto wax paper and allow to cool completely.

M & M Popcorn Balls

Standard

OK, so what better way to combine two of my favorite movie time foods? This recipe is so easy and great for movie night at home or a snack.

images-4

Ingredients

1 (8 ounce) package miniature marshmallows
4 tablespoons butter
1 (3 1/3 ounce) package microwave kettle popcorn
1 1⁄2 cups M & M’s

Directions

Pop the kettle corn in the microwave as directed on package. Remove unpopped kernels.

download-1

Microwave Method:.
In a large bowl, combine marshmallows and butter. Microwave on high in 30 second intervals, stirring between each until marshmallows are melted and smooth (about 2 minutes)
Add popcorn, stirring to coat.
Cool 5 minutes.
Stir in M & M’s. Let set for 5 minutes.
Dip hands in cold water and form mixture into 10 balls.
Store popcorn balls in individual plastic bags at room temperature.

Stove Top Method:.
Melt butter in a large pot and add marshmallows.
Stir until smooth and all melted.
Add popcorn to a large bowl and pour the melted butter marshmallow mixture over top of popcorn. Stir well to coat popcorn.
Let cool 5 minutes.
Add M & M’s and stir well. Let stand for 5 minutes.
Dip hands in cold water and form mixture into 10 balls.
Store popcorn in individual plastic bags at room temperature.

Flourless Chocolate Candy Cakes

Standard

Got leftover Halloween candy? Transform it into mini-chocolate cakes courtesy of this flour-free recipe.

b79b2ce8-b58d-40f2-bde9-0a0d19ae5845

Ingredients

6 tablespoons unsalted butter
12 milk chocolate candy drops or pieces, unwrapped (2 oz)
1 cup semisweet chocolate chips (6 oz)
6 eggs, separated
3/4 cup granulated sugar
Powdered sugar for garnish, if desired

Directions

1. Heat oven to 325°F. Spray 8 (7-oz) ramekins with cooking spray. Set aside.

2. In large microwavable bowl, microwave butter, candy drops and chocolate chips on High in 30-second increments, stirring after each, until completely melted. Cool slightly.

3. While chocolate is cooling, in another large bowl, beat egg whites with electric mixer on high speed until stiff peaks form. Gradually add sugar, beating until glossy.

4. With whisk, beat egg yolks one at a time into chocolate mixture. Add half of beaten egg whites; fold in with rubber spatula until combined. Carefully fold in remaining half of beaten egg whites. Spoon mixture evenly into ramekins.

5.Bake 35 to 45 minutes or until cakes pull away from sides of ramekins. Sprinkle with powdered sugar.

Red-Wine Velvet Cake Recipe

Standard

Rather than let an open bottle of red wine languish on the refrigerator shelf, use it in place of the usual food coloring in a red velvet cake. The result—a rich, fudgy marriage of chocolate and wine—will leave you hopeful for more leftover Pinot Noir in the near future.

images-2

Makes 1 cake, to serve 16 to 20.

Ingredients

Cake:
18 Tbsp. unsalted butter at room temperature, plus more for greasing
2 1/4 cups packed dark brown sugar
3/4 cup granulated sugar
4 large eggs, at room temperature
1 large egg yolk
2 1/4 cups red wine
1 Tbsp. vanilla extract
3 cups plus 2 Tbsp. all-purpose flour
1 1/2 cups Dutch-process cocoa powder
3/8 tsp. baking soda
1 1/2 tsp. baking powder
3/4 tsp. ground cinnamon
3/4 tsp. salt

Frosting:
24 ounces cream cheese (three 8-ounce boxes), at room temperature
3/4 cup (1 1/2 sticks) butter, at room temperature
2 tsp. vanilla extract
3 1/2 cups confectioners’ sugar

201210-omag-cooking-cake-300x205

Directions

1. To make cake: Preheat oven to 325°. Line the bottom of three 9 round cake pans with parchment paper. Grease parchment and sides of pan. Place butter in a large bowl. Using an electric mixer, cream butter on medium speed until smooth. Add brown and granulated sugars and beat until fluffy, about 3 minutes. Add eggs and yolk and beat until incorporated, then add red wine and vanilla. (Don’t worry if the batter looks a little uneven and grainy.)

2. In a medium bowl, mix flour, cocoa powder, baking soda, baking powder, cinnamon, and salt. Sift dry mixture over wet ingredients. Mix until 3/4 combined, then fold in remaining dry mixture with a rubber spatula.

3. Divide batter among prepared pans. Bake 25 to 30 minutes, or until a cake tester inserted into the center of each layer comes out clean. The top of each cake should be shiny and smooth. Cool in the pan 10 minutes, then remove cakes from pans and let cool completely on a rack. (If cakes have domed a bit and you want even layers, trim tops using a long serrated knife held horizontally.)

4. To make frosting: In a medium bowl, use an electric mixer to beat cream cheese and butter until smooth. Mix in vanilla, then gradually stir in confectioners’ sugar.

5. To frost cake, place one layer on a cake stand or plate and spread with 1 cup frosting. Repeat with next 2 layers and spread top and sides with remaining frosting.

Geneva Switzerland 2016

Standard

The second leg of #birthday2016 is Switzerland which makes sense for this lover of chocolate! Being outdoors here I notice that the air is quite fresh for Europe given the fact that no one has gotten the cigarettes kill memo. As usual, the first visit to any country gets an immediate do-over to give me a fair chance to research likes and dislikes about the place.

img_20160913_202452img_20160913_204230img_20160914_170303img_20160913_163116971_hdrimg_20160913_163535658

Hazelnut-Brown-Butter Brownies

Standard

Why not use nut flour to make gluten-free brownies? These are delicious!

54f64231b6b42_-_hazelnut-brown-butter-brownies-recipe-fw0512-xl

Ingredients

7 oz. hazelnuts
1 cups Unsweetened cocoa powder
2 tbsp. Unsweetened cocoa powder
1 tsp. salt
3 cups sugar
1 lb. unsalted butter
12 oz. bittersweet chocolate (70 percent)
6 large eggs
1 tbsp. tablespoon instant coffee

Directions

1. Preheat the oven to 325 degrees F. Line a 9- by 13-inch baking pan with foil, pressing it into the corners and leaving overhang on the 2 short sides.

2. Spread the hazelnuts in a pie plate and toast for 15 minutes, until fragrant and the skins blister; transfer to a kitchen towel to cool slightly, then rub off the skins. Let cool completely. Transfer the nuts to a food processor. Add the cocoa, salt, and 1/2 cup of the sugar and pulse until finely ground.

3 In a large saucepan, cook the butter over moderate heat, shaking the pan occasionally, until nutty-smelling and golden and the foam subsides, about 5 minutes. Remove from the heat and add the chopped chocolate; let stand until melted, about 2 minutes. Whisk the butter and chocolate until smooth, scraping up any browned butter solids from the bottom of the pan. Let cool slightly.

4. In a large bowl, using an electric mixer, beat the eggs with the remaining 2 1/2 cups of sugar and the coffee until tripled in volume, about 5 minutes. Beat in the chocolate-butter mixture. Add the cocoa-hazelnut mixture and beat to combine, scraping down the bowl. Scrape the batter into the prepared pan and bake for about 50 minutes, until the top is glossy and a toothpick inserted in the center comes out with a few moist crumbs attached. Let the brownie cool completely on a rack, then refrigerate until chilled.

5. Lift the brownie out of the pan and peel off the foil. Cut into 20 pieces and serve.

Il Diplomatico Chocolate Cake

Standard

This coffee-soaked dessert is often made with shop-bought Madeira cake, so feel free to take the short cut if time’s tight. To intensify the coffee hit you may add espresso to the chocolate mousse filling and the cream topping too – it’s not strictly traditional, but it’s delicious. You’ll need to begin this recipe 2 days ahead.

ab01fb789b1bd07f8c2e219e900f59c5

Ingredients

250 ml espresso-strength coffee
50 ml golden rum
100 gm caster sugar
450 gm dark chocolate (60-65% cocoa solids), finely chopped
700 ml thickened cream
3 cups thickened cream
4 eggs
To serve:chocolate-coated coffee beans, coarsely crushed (optional)

Madeira Cake

175 gm softened butter
155 gm caster sugar
Finely grated rind and juice of 1 lemon
3 eggs
250 gm (1 2/3 cups)plain flour, sieved
1 tsp ground cinnamon
½ tsp baking powder
2 tbsp milk

Directions

1. For Madeira cake, preheat oven to 160 C. Beat butter, sugar and lemon rind in an electric mixer until light and fluffy (3-4 minutes). Scrape down sides of bowl and add eggs one at a time, beating well after each addition. Stir in flour, cinnamon and baking powder to combine, then add milk and lemon juice and stir until smooth. Spoon into a greased 8 cm x 22 cm loaf tin lined with baking paper, smooth top and bake until cake is light golden and a skewer inserted withdraws clean (45-50 minutes). Cool completely, then turn out and stand, uncovered, for 24 hours to dry out.

2. Stir 150 ml espresso, rum, 1½ tbsp sugar and 50 ml water in a bowl until sugar dissolves and set aside.

3. Slice Madeira cake width-ways into 5 mm- thick slices and line base and sides of an 8 cm x 22 cm loaf tin lined with plastic wrap (let plastic wrap hang over sides of tin), trimming cake to fit and filling all gaps (set aside remaining cake). Brush generously with espresso mixture and set aside.

4. Melt chocolate in a heatproof bowl over a saucepan of simmering water (3-4 minutes), then set aside. Whisk 400 ml cream in an electric mixer until soft peaks form (4-5 minutes), then refrigerate until required. Whisk eggs, remaining sugar and 50 ml espresso in a heatproof bowl over a saucepan of simmering water until thick and pale (3-4 minutes), remove from heat and fold in melted chocolate, then whipped cream. Spoon into cake-lined tin, smooth top, then cover mousse with remaining cake slices, trimming to fit. Brush with espresso mixture, cover and refrigerate for 24 hours or up to a week. Whisk remaining cream and remaining espresso to soft peaks. Invert cake onto a platter, top with whipped cream, scatter crushed coffee beans over and serve.

Chocolate & Caramelized Banana Tart

Standard

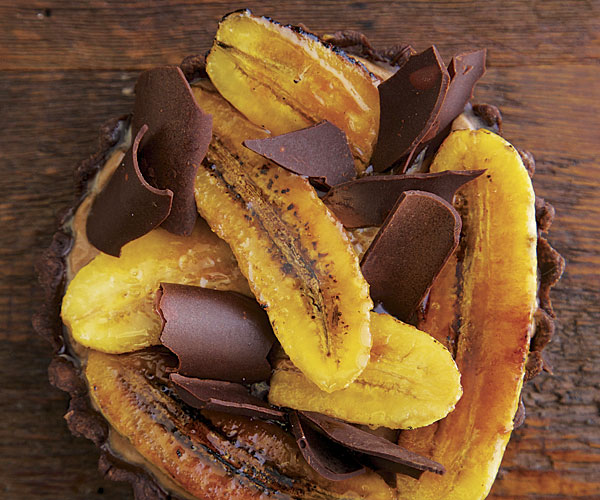
A cocoa crust, chocolate-cream filling and shards of dark chocolate play off the bananas’ creamy sweetness. For best results, chill the filled tart before topping it with the bananas; otherwise, the filling may be too soft to hold the fruit up well.

051137093-02-chocolate-caramelized-banana-tart-recipe_xlg

Ingredients

For the crust

8-1/4 oz. (1-3/4 cups) all-purpose flour; more for dusting
3-1/2 oz. (3/4 cup plus 2 Tbs.) confectioners’ sugar
1-3/4 oz. (7 Tbs.) sifted cocoa, preferably Dutch process
6 oz. (12 Tbs.) cold unsalted butter, cut into 1/2-inch pieces
1/2 tsp. kosher salt
2 large eggs, 1 separated
Cooking spray
1 oz. melted dark (70%) chocolate

TIP:
This recipe makes enough dough for two tart crusts; use one now and freeze the other for a delicious tart in your future.

For the filling

1 cup whole milk
1/4 cup granulated sugar
1/2 vanilla bean or 1/2 tsp. pure vanilla extract or paste
1 large egg
1 large egg yolk
1-1/2 Tbs. cornstarch
1 Tbs. unsalted butter, cut into 1/2-inch pieces
2 oz. warm melted dark chocolate
1/2 cup whipping or heavy cream
For topping and finishing the tart

4 medium bananas
2 Tbs. granulated sugar
Dark chocolate shards, for garnish (video: How to Make Chocolate Shards)

Directions

Make the dough

1. In a stand mixer fitted with the paddle attachment, combine the flour, sugar, cocoa, butter, and salt. Mix on low speed until the butter begins to break up, about 1 minute. Increase the speed to just below medium and continue beating until the mixture looks sandy with butter pieces the size of tiny pebbles, about 2 minutes more.

2. Turn the mixer off and add the whole egg and egg yolk (reserve the remaining white). Mix on low speed until the eggs are fully incorporated. Increase the speed to medium and mix just until the dough pulls away from the sides of the bowl, about 30 seconds. Do not overmix.

3. Divide the dough in half, press each half into a disk about 4 inches across, and wrap in plastic. Refrigerate 1 disk for at least 3 hours and up to 24 hours. (Freeze the other disk for up to a month; thaw in the refrigerator before using.)

Shape and bake the crust

1. Lightly flour a work surface and a rolling pin. Spray a 9-1/2- to 11-inch fluted tart pan with a removable bottom with cooking spray.

2. Working quickly, roll the dough disk into a 1/8-inch-thick round. Transfer the dough to the tart pan and gently coax it into the pan, allowing the excess dough to hang over the sides. Roll the rolling pin over the top of the pan to cut off the excess dough. Patch any tears or cracks with the scraps. Refrigerate the crust for at least 20 minutes or freeze for 10 minutes. Meanwhile, position a rack in the center of the oven and heat the oven to 375°F.

3. Line the crust with parchment paper and fill it to the very top with beans or pie weights. Bake until the edges are golden, 18 to 20 minutes. Carefully remove the weights and paper. Bake until the center of the crust looks dry and is just beginning to color, about 5 minutes.

4. Beat the reserved egg white. Brush the inside of the crust with some of the egg white (you won’t need it all) and return the crust to the oven until the egg white has dried, about 2 minutes. (This prevents the crust from getting soggy once you add the filling.) Cool completely on a rack.

5. Brush the interior of the cooled crust with the melted chocolate. Let it set for a few minutes in the fridge before proceeding.

Make the pastry cream

1. Combine the milk and 2 Tbs. of the sugar in a 3- to 4-quart saucepan. If using a vanilla bean, split it and scrape the seeds into the milk, then add the pod. Bring to a boil, stirring occasionally, about 5 minutes. Remove the vanilla bean pod, if using.

2. Meanwhile, in a medium heatproof bowl, whisk the remaining 2 Tbs. sugar with the egg, egg yolk, and cornstarch until smooth, about 1 minute. Whisk half of the hot milk into the egg mixture until combined. Off the heat, whisk the contents of the bowl back into the remaining milk in the saucepan.

3. Cook over medium heat, whisking constantly, until the mixture reaches a boil; it will thicken. Continue to cook for another minute past the boil, whisking constantly. Off the heat, whisk in the butter and vanilla paste or extract, if using. Stir a little pastry cream into the melted chocolate to temper it. Fold this back into the rest of the pastry cream. Strain the pastry cream through a medium-mesh sieve into a medium heatproof bowl. Cover with plastic wrap pressed onto the surface of the pastry cream to prevent a skin from forming. Refrigerate until cold, at least 2 hours and up to 3 days.

Fill and top the tart

1. In a medium bowl, beat the cream to stiff peaks with an electric hand mixer or a whisk.

2. Beat the pastry cream to soften and smooth it. With a large spatula, fold the whipped cream into the softened pastry cream until thoroughly combined. Fill the crust with the crème légère, evening it out with the spatula. Refrigerate for at least 1 hour before topping with the bananas.

3. Cut the bananas into 1/2-inch slices (you can either cut them lengthwise as shown, or crosswise into rounds or ovals). Arrange the slices on a large foil-lined baking sheet. Working in batches, sprinkle the top of each slice completely with sugar. With a kitchen torch, heat the sugared top until caramelized. Repeat with the remaining slices. Arrange the caramelized bananas on top of the filling. Note that because the filling is soft, you’ll need to work quickly while the filling is cold and more firm. Because it’s hard to move the bananas once they’re on the filling, you may want to practice your pattern on an empty sheet pan before placing it on the tart.

4. Garnish the tart with the chocolate shards. Refrigerate the tart until ready to serve. Serve the tart cold, within 6 hours of topping.

Variations

You can make four 4-1/2-inch tarts (shown here) from one batch of filling and one dough disk. Reduce the baking time for the crusts, and fill the crusts two-thirds full.

Lemon Chocolate Pie

Standard

Where most lemon pies are single crusted affairs, this pie is double crusted with a thick, sweet lemon filling that’s similar to the pudding-like innards of a Lemon Meringue. Once the pie is baked and cooled, its top is covered with what amounts to chocolate frosting.

20120424-203489-lemon-chocolate-pie-primary-thumb-625xauto-237636

Ingredients

For the Filling
5 large egg yolks
1 1/4 cups sugar
1/3 cups cornstarch
1/3 cups cold water
1 1/2 cups very hot water
2 tablespoons melted unsalted butter
1 tablespoon lemon zest
1/2 cup fresh juice from 6 to 8 lemons
2 teaspoons vanilla extract
For the Crust
2 unbaked pie crusts (I used the Food Lab’s Easy Pie Crust)
1 egg white
For the Chocolate Topping
5 ounces 72% cacao chocolate
3 tablespoons unsalted butter
1 tablespoon dark corn syrup

Directions

1.
Adjust oven rack to center position and preheat oven to 400°F. Whisk together egg yolks in a medium bowl and set aside. In a medium saucepan, mix together the sugar and cornstarch. Add cold water and stir to moisten. Then add hot water, while stirring, and cook over medium-high heat, stirring occasionally. Mixture will begin to turn translucent and thicken. When mixture begins to bubble lightly, remove from heat. Stir in melted butter. Add egg yolks while whisking constantly. Add the lemon zest, lemon juice, and vanilla extract whisking until thoroughly combined. Place in refrigerator to cool, about 15 minutes.

2.
Roll out crusts. For a 9-inch pan your bottom crust should be around 11 inches in diameter. Place bottom crust in pie pan or dish. Pour in cooled pie filling. Place rolled out top crust over filled pie. Seal and flute edges. Cut several slits in the top of the pie to vent then brush entire top crust with egg white and bake for 20 minutes. Turn oven down to 375°F and bake for an additional 15 to 25 minutes or until crust is golden brown. Remove pie from oven and cool completely.

3.
Combine chocolate and butter in a medium microwave-safe bowl. Microwave on high for 30 seconds and then stir, repeat, heating in 15 second increments until butter is just melted and smooth. Stir in corn syrup. Set mixture aside until it is only slightly warm to touch.

4.
Pour chocolate mixture over cooled pie and spread to completely cover the top of the pie. Refrigerate until ready to serve. Store covered.

Velvety Dark Chocolate Pudding With Candied Orange Peel

Standard

I wouldn’t call myself a pudding connoisseur. My experience with pudding falls somewhere in between Jello and Magic Moments. I know what I like, chocolate before caramel then vanilla, this is to be true. This recipe for chocolate pudding is equal parts science and delicious. You start with a liquid consisting of milk, sugar, chocolate, cornstarch, and eggs, then science does its thing, like science does, and then you have pudding. Unbelievable! Alright, there’s a little more to it than science. A little magic as well. Enjoy!

Collage-4

Ingredients

2 cups whole milk
1/4 cup granulated sugar
pinch of salt
2 tbsp Dutch-processed cocoa powder
1 tbsp corn starch
1/3 cup cream
2 large egg yolks
1 large egg
1 cup bitter sweet chocolate, chopped
2 tbsp butter, unsalted
1 tsp orange extract
candied orange peel

Collage-3

Directions

1. In a medium saucepan, bring 2 cups of milk, sugar, and salt to a simmer on low-medium heat.

2. In a small bowl, whisk the cocoa powder, corn starch, and cream. Whisk the corn powder slurry into the warm milk.

3. In a small bowl, beat the 2 egg yolks and the one egg. Slowly add a ladle of the warm milk to the eggs and whisk. You want to warm the eggs. Whisk the eggs into the milk mixture.

4. Bring the pudding to a boil until one or two bubbles start popping. Reduce the heat and continue whisking the pudding until it reaches the consistency of a creamy soup.

5. Once the pudding has reached the consistency of thick soup, remove it from the heat. Microwave the chocolate and butter until slightly melted. Whisk into the pudding, followed by the orange extract.

6. Pour the pudding through a fine strainer, if you prefer no lumps. I omitted this stage, because I am straight up lazy.

7. Pour the pudding into serving glasses or dishes. The pudding should be easy to pour and start to thicken if not stirred. Cover with plastic wrap and place in the fridge. If you don’t like the pudding skin, then make sure the piece of plastic wrap is touching the pudding. When you remove the plastic, you will also remove the pudding skin.

8. Garnish with candied orange peel.