Tag Archives: Baking

Malted-Milk Chocolate Cake

Standard

In this recipe, the frosting is made first, then part is reserved to ice the cake and the rest is used in the batter. To melt chocolate, place it in a small bowl or custard cup; microwave at HIGH 1 1/2 minutes or until soft, stirring until melted.

Malted Milk Chocolate Cake
Ingredients

Cooking spray
1 tablespoon all-purpose flour
2 tablespoons butter or stick margarine, softened
2 teaspoons vanilla extract
1 (8-ounce) block 1/3-less-fat cream cheese, chilled
5 cups powdered sugar (about 1 1/4 pounds)
3 tablespoons hot water
3 ounces unsweetened chocolate, melted
1/3 cup vegetable shortening
3 large eggs
1 3/4 cups all-purpose flour
1/2 cup malted-milk powder
2 1/2 teaspoons baking powder
1/2 teaspoon salt
2/3 cup fat-free milk
1/3 cup coarsely chopped malted-milk balls

Preparation

1. Preheat oven to 350°

2. Coat bottoms of 2 (9-inch) round cake pans with cooking spray (do not coat sides of pan); line bottoms with wax paper. Coat wax paper with cooking spray; dust with 1 tablespoon flour.

3. Combine butter, vanilla, and cream cheese in a large bowl; beat at medium-high speed of a mixer 2 minutes. Gradually add sugar, beating at low speed just until smooth. Add hot water; beat just until smooth. Add chocolate; beat just until smooth. Reserve 1 3/4 cups chocolate mixture for frosting; cover and chill 2 hours. Add shortening to remaining chocolate mixture in bowl. Beat at medium speed of a mixer until well-blended (about 1 minute). Add eggs, 1 at a time, beating well after each addition.

4. Lightly spoon 1 3/4 cups flour into dry measuring cups, level with a knife.
Combine 1 3/4 cups flour, milk powder, baking powder, and salt, stirring well with a whisk. Add the flour mixture to the egg mixture alternately with milk, beginning and ending with the flour mixture.

5. Pour batter into prepared pans. Sharply tap pans once on counter to remove air bubbles. Bake at 350° for 25 minutes or until a wooden pick inserted in center comes out clean. Cool in pans 10 minutes on a wire rack; remove from pans. Remove wax paper. Cool completely on wire rack.

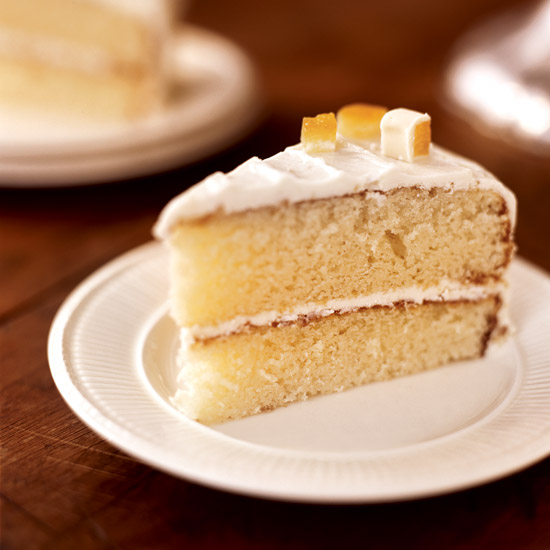
6. Place 1 cake layer on a plate; spread with 1/2 cup frosting, and top with remaining cake layer. Spread remaining frosting over top and sides of cake; sprinkle top of cake with chopped malted-milk balls. Chill 1 hour. Store cake loosely covered in refrigerator.

White Chocolate Cake with Orange Marmalade Filling

Standard

The filling for this cake calls for orange marmalade, but you can also use seedless raspberry or apricot jam. These would work well with the candied orange peel garnish. Edible flowers would also make a lovely decoration.

FW1104FTG10

Active: 25 mins
Total Time: 3 hrs
Servings: 12

Ingredients

2 1/4 cups all-purpose flour
2 1/2 teaspoons baking powder
1/4 teaspoon salt
1 1/2 sticks (6 ounces) unsalted butter, softened
1 1/2 cups sugar
4 large eggs
1 teaspoon pure vanilla extract
1 1/4 cups milk
8 ounces white chocolate, melted
2 tablespoons orange marmalade, very finely chopped if chunky
1/4 cup confectioners’ sugar
White Chocolate Buttercream
1/2 cup Candied Orange Peels, dipped in white chocolate, for garnish

Directions

1. Preheat the oven to 350°. Butter and flour two 9-inch round cake pans.

2. Sift the flour with the baking powder and salt. In a large bowl, using an electric mixer, beat the butter at low speed until smooth. Add the sugar and beat until fluffy. Add the eggs, 1 at a time, beating well after each addition. Add the vanilla. At low speed, alternately beat in the dry ingredients and the milk in 2 additions. Add the melted white chocolate and beat just until incorporated. Scrape the batter into the prepared cake pans and smooth the surfaces.

3. Bake the cakes in the center of the oven for 35 minutes, or until golden brown and a toothpick inserted into the centers comes out clean. Let the cakes cool in the pans for 10 minutes, then invert them onto a wire rack and let cool completely.

4. In a small bowl, using a handheld electric mixer, beat the orange marmalade and the confectioners’ sugar into 1 cup of the White Chocolate Buttercream. Set 1 cake layer on a cake plate, right side up, and spread the filling on top. Cover with the second cake layer. Frost the sides and top of the cake with the remaining White Chocolate Buttercream. Garnish with the white chocolate–dipped Candied Orange Peels and serve.

Gooey Butter Brownies

Standard

Happy Friday and Labor Day weekend. Here is a really fun recipe for my #chocolatefriendsofTenaciousM to try!! Have a safe and amazing holiday weekend!

Gooey butter brownies. It’s okay if you just died right then. The sweet, gooey burst of buttery chocolate will revive you. It’s genius. I hope you’ll make these, because they are so, so good!

gooey-butter-brownies

Prep Time: 10 minutes
Cook Time: 40 minutes
Total Time: 50 minutes

Ingredients

For the brownies:
1 box brownie mix
1 egg
8 tablespoons butter, melted

For the topping:
8 ounces cream cheese, room temperature
2 eggs
8 tablespoons butter, melted
1 teaspoon vanilla
16 ounces powdered sugar

Directions

1. Preheat oven to 350 degrees.

2. To make the brownie base, mix together the dry mix, egg, and melted butter. Spread into a greased 9×13 baking dish.

3. To make the topping, beat together the cream cheese, eggs, vanilla, butter, and powdered sugar until well combined. Spread over the brownies.

4. Bake for 40 minutes or until the center is still slightly jiggly and gooey. Cool before serving.

Mini Chocolate-Hazelnut Cheesecakes

Standard

Break up whole, cream-filled chocolate sandwich cookies in a food processor with hazelnuts and butter to create a super-crunchy crust for these delectable little cheesecakes. The cream filling in the cookies both sweetens the crust and prevents it from becoming too crumbly.

Mini Chocolate-Hazelnut Cheesecakes

Active Time: 10 Min
Total Time: 40 Min
Servings: Makes 12 Tartlets

Ingredients

15 cream-filled chocolate sandwich cookies
2 tablespoons raw or roasted hazelnuts, skinned
2 tablespoons unsalted butter, softened
8 ounces cream cheese
3/4 cup hazelnut-chocolate spread, preferably Nutella
1/2 cup sour cream
2 large eggs
2 tablespoons sugar
2 tablespoons mini chocolate chips

Directions

1. Preheat the oven to 350°. Line a 12-cup muffin tin with paper liners. Spray the liners with vegetable oil spray.

2. In a food processor, combine the cookies, hazelnuts and butter and process to very fine crumbs. Divide the crumbs among the cups and, using a flat-bottomed glass, press on the crumbs to compact them. Bake for 5 minutes.

3. Meanwhile, wipe out the food processor bowl. Add the cream cheese, Nutella, sour cream, eggs and sugar and puree until smooth. Spoon the filling into the cups until it nearly reaches the top; there may be a few tablespoons of leftover batter. Sprinkle the chocolate chips on top and bake for about 20 minutes, until the cheesecakes have risen and the surfaces are lightly cracked. Let the cheesecakes cool slightly, then transfer the muffin tin to a rack and freeze for 10 minutes, until the cheesecakes are slightly cooled. Serve chilled or at room temperature.

MAKE AHEAD The mini cheesecakes can be refrigerated in an airtight container for up to 3 days.

Chocolate Crunch Bark and Spiced Cashew Brittle

Standard

Crunchy chocolate bark alongside cayenne-spiked cashew brittle is delicious. Awesome!

spiced-cashew-brittle-chocolate-crunch-bark-recipe-fw0512-th2

Yields: about 2 pounds
Total Time: 1 hr 15 min

Ingredients

1 1/2 cup(s) whole raw cashews
1 cup(s) sugar
1/2 cup(s) light corn syrup
1 stick(s) unsalted butter, cut into tablespoons
1/4 cup(s) water
1/2 teaspoon(s) baking soda
1/4 teaspoon(s) cayenne pepper
8 ounce(s) bittersweet chocolate, finely chopped
1/2 cup(s) Rice Krispies or feuilletine

Directions

1. Preheat the oven to 325 degrees F. Spread the cashews on a small baking sheet and toast for 10 minutes, stirring once. Keep the cashews warm.

2. Line a rimmed baking sheet with buttered parchment paper. In a saucepan, bring the sugar, corn syrup, butter, and water to a boil. Cook over moderately high heat, stirring, until a deep amber toffee forms, about 10 minutes. Remove from the heat. Whisk in the baking soda and cayenne; it will bubble up. Using a wooden spoon, stir in the warm cashews.

3. Pour the hot candy onto the baking sheet and spread it as thinly as possible. Let cool completely, then break into large shards.

4. Line a baking sheet with parchment paper. In a heatproof bowl set over (not in) a saucepan of simmering water, melt two-thirds of the chocolate. Stir until the chocolate reaches 130 degrees F. Remove the bowl from the heat and stir in the remaining chocolate until melted and the temperature drops to 85 degrees F. Return the bowl to the saucepan and warm the chocolate to 90 degrees F, stirring. Remove from the heat. Fold in the Rice Krispies. Spread the mixture on the parchment in a 1/4-inch-thick layer. Let harden completely, then break into large shards.

Rocky Road Bars

Standard

I figure if the ice cream works for me, I should try the cookies as well. Who wouldn’t like to find one of these rich treats in a lunchbox or party favor bag? Just wrap each bar in a piece of waxed paper for mess-free transport. Place walnuts in a resealable plastic bag, and use a rolling pin or meat mallet to crush them to desired size.

Rocky Road Bars 1

PREP: 10 MINS
TOTAL TIME: 2 HOURS 45 MINS
SERVINGS:12

Ingredients

8 tablespoons (1 stick) unsalted butter, plus more for pan
1/2 cup unsweetened cocoa powder
1 cup packed light-brown sugar
1 large egg, lightly beaten
1/2 cup all-purpose flour, (spooned and leveled)
1/2 cup milk
1 teaspoon vanilla extract
1 cup mini marshmallows
1 cup coarsely chopped walnuts
1 cup semisweet chocolate chips

Directions

STEP 1
Preheat oven to 350 degrees. Lightly butter an 8-inch square pan. Line with parchment paper, leaving an overhang on two sides; butter the paper. Set aside.

STEP 2
In a medium saucepan, place butter and cocoa; heat over low, stirring constantly, until butter has melted and mixture is smooth. Remove from heat; stir in sugar, egg, flour, milk, and vanilla until combined.

Rocky Road Bars

STEP 3
Spread mixture evenly in prepared pan. Bake until a toothpick inserted in center comes out clean, 25 to 30 minutes. Remove pan from oven; sprinkle top evenly with marshmallows, walnuts, and chocolate chips. Return to oven, and bake until marshmallows puff, about 3 minutes. Cool to room temperature on a wire rack, about 1 hour. Then refrigerate until topping hardens, about 1 hour. Use paper overhang to lift from pan; cut into 12 bars.

Chocolate-Mint Thumbprints

Standard

Thumbprint cookies — made by pressing a small round of dough with the thumb to form an indentation — are great for filling with chocolate or jam. Feel free to mix the batter with any kind of mint-flavored candy, like Andes chocolate mints, but any kind of mint-flavored chocolate works well.

chocolate-mint-thumbprint-pqWiiM-lg

Yields: 44 cookies
Total Time: 2 hr 30 min

Ingredients

2 ounce(s) bittersweet chocolate, chopped
2 ounce(s) mint chocolate, chopped
1 1/2 cup(s) all-purpose flour
1/2 cup(s) unsweetened Dutch-process cocoa
3/4 teaspoon(s) salt
2 stick(s) unsalted butter, softened
1/3 cup(s) granulated sugar
2 tablespoon(s) dark brown sugar
2 large egg yolks
1 teaspoon(s) pure vanilla extract
1 cup(s) coarse sugar such as Turbinado, for rolling
3 ounce(s) white chocolate, chopped
3 tablespoon(s) heavy cream
1/2 teaspoon(s) pure peppermint extract

Directions

1. In a microwave-safe bowl, melt the bittersweet and mint chocolates in 30-second intervals until nearly melted. Whisk until smooth, then let cool. In a medium bowl, whisk the flour with the cocoa and salt.

2. In the bowl of a standing electric mixer fitted with the paddle, beat the butter until creamy. Add the granulated sugar and brown sugar and beat at medium-high speed until light and fluffy, about 3 minutes. Beat in the egg yolks and vanilla. Scrape the chocolate into the mixer and beat just until incorporated. Add the dry ingredients and beat at low speed, scraping the side of the bowl occasionally, until smooth. Transfer the dough to a sheet of plastic wrap and pat it into a 7-inch disk; wrap it up and refrigerate until chilled and firm, at least 1 hour.

3. Preheat the oven to 350°F and position racks in the upper and lower thirds. Line 2 cookie sheets with parchment paper. Spread the coarse sugar in a shallow bowl. Scoop up tablespoons of the dough and roll them into balls, then roll in the coarse sugar; transfer to the baking sheets. Using your thumb or a melon baller, make an indentation in the center of each cookie. Bake the cookies for 10 minutes, until slightly firm. Remove the cookie sheets from the oven. Using the melon baller, press into the cookies again. Return the cookies to the oven, shifting the cookie sheets, and bake for 5 minutes longer, just until dry but not hard. Transfer the cookie sheets to racks to cool completely.

4. Put the white chocolate in a heatproof cup. Put the cream into a microwave-safe bowl and microwave at high power until boiling, about 30 seconds. Pour the hot cream over the white chocolate and let stand until melted, then whisk until smooth. Stir in the peppermint extract. Fill the thumbprints with the white-chocolate ganache and refrigerate just until set, about 30 minutes.

Hawaiian Brownie Sundaes

Standard

Insanely Delicious!! The dark, rich chocolate in these Hawaiian-style brownies perfectly complements the sweet, moist coconut and macadamia nuts. Enjoy!

hawaiian-brownie-sundae_0003-lg

Total Time: 1 hr 20 min
Prep Time: 35 min
Cook Time: 45 min

Ingredients

Brownies
Shortening, for preparing pan
1 teaspoon(s) cocoa powder, for preparing pan
1/2 pound(s) unsalted butter
1 pound(s) semisweet chocolate chips, divided
3 ounce(s) premium unsweetened chocolate
3 large eggs
2 tablespoon(s) chocolate syrup
1 tablespoon(s) pure vanilla extract
1 cup(s) sugar
2 tablespoon(s) sugar
1/2 cup(s) all-purpose flour
2 tablespoon(s) all-purpose flour
1 1/2 teaspoon(s) baking powder
1/4 teaspoon(s) fine sea salt
1 cup(s) coarsely chopped macadamia nuts
1 cup(s) sweetened flaked coconut

Chocolate Sauce
8 ounce(s) premium semisweet chocolate, finely chopped
1 cup(s) heavy cream
1 teaspoon(s) pure vanilla extract

For Serving
1 quart(s) premium coffee ice cream
1/2 cup(s) toasted coconut, for garnish
Fresh mint leaves, for garnish

Directions

1. Preheat oven to 350°F. Grease a 9-by-9-inch pan with shortening, then coat with cocoa powder. Set aside.

2. Place butter, 1/2 pound chocolate chips, and unsweetened chocolate in top of a double boiler or in a heat-proof bowl set over a pan of simmering water until melted and smooth, stirring frequently. Cool slightly. In a large mixing bowl, combine eggs, chocolate syrup, vanilla, and sugar. Add mixture to warm melted chocolate and cool.

3. In a separate mixing bowl, combine 1/2 cup flour with baking powder and salt, then stir into chocolate mixture. In another mixing bowl, combine macadamia nuts and remaining 1/2 pound chocolate chips with 2 tablespoons flour until nuts and chips are coated. Add nuts, chips, and coconut to chocolate mixture and combine thoroughly. Pour mixture into the prepared pan.

4. Bake for 12 minutes. Remove pan from oven, tap it several times to remove air from brownies. Continue to bake for another 12 to 15 minutes, or until a toothpick inserted into the middle comes out clean. Cool completely.

5. Make the sauce by placing chopped chocolate in a medium-sized mixing bowl. Place cream in a small saucepan over medium heat and bring just to a boil. Immediately remove from heat and pour over the chocolate and stir until smooth. Add the vanilla and stir until combined.

6. Cut brownies into 8 large squares and place on serving plates. Top each with two scoops of ice cream (about 1/2 cup), ladle with chocolate sauce to taste, and sprinkle with toasted coconut and powdered sugar. Garnish with mint leaves and serve immediately.

No-Bake Chocolate and Peanut Butter Oatmeal Bars

Standard

With a candy-bar-inspired top and a crumbly cookie base, each of these rich squares packs a double dose of that perfect pairing: chocolate and peanut butter.

No-Bake Chocolate and Peanut Butter Oatmeal Bars

YIELD:Makes 2 dozen

INGREDIENTS

Vegetable oil cooking spray
9 ounces chocolate wafers (about 40 wafers), finely ground (2 cups)
1 1/2 cups old-fashioned oats
1 1/4 cups confectioners’ sugar
1/4 teaspoon coarse salt
5 ounces (1 stick plus 2 tablespoons) unsalted butter, cut into small pieces
1 cup chunky peanut butter
3/4 cup plus 3 tablespoons smooth peanut butter
10 ounces semisweet chocolate, melted
1 1/2 ounces milk chocolate, melted

DIRECTIONS

STEP 1
Coat a 9-by-13-inch baking dish with cooking spray. Line with parchment, leaving a 2-inch overhang on the 2 long sides.

STEP 2
Combine wafers, oats, sugar, and salt in a large bowl. Melt butter in a medium saucepan over medium heat, then add chunky peanut butter and 3/4 cup smooth peanut butter, whisking until well combined. Add peanut butter mixture to wafer mixture, stirring until combined. Transfer to baking dish, and use the bottom of a measuring cup or an offset spatula to firmly press mixture into an even layer. Refrigerate for 30 minutes.

STEP 3
Pour melted semisweet chocolate over chilled mixture and, using an offset spatula, spread into a thin layer that covers the entire surface. Refrigerate until hardened, at least 15 minutes.

STEP 4
Heat remaining 3 tablespoons smooth peanut butter in a small saucepan until runny. Drizzle peanut butter over chilled chocolate. Drizzle melted milk chocolate over peanut butter. Refrigerate until hardened, about 15 minutes.

STEP 5
Use parchment to lift out chilled block of bars. Run a sharp knife under hot water, dry well, and cut into 24 squares, wiping knife between cuts. Let bars stand at room temperature for 10 minutes before serving.

Fudgy Fantasy Bars

Standard

fudgy-fantasy-bars_0014-lg

These chocolate Italian cream bars will surely melt in your mouth. They are delicious and well worth the effort.

Yields: 36 bars
Total Time: 25 min
Prep Time: 10 min
Cook Time: 15 min

Ingredients

1 package(s) (17.5 ounces) sugar cookie mix
1/2 cup(s) cocoa baking powder
1/2 cup(s) butter or margarine, melted
1 large egg
2/3 cup(s) toasted chopped pecans
1/2 cup(s) sweetened flaked coconut
1 package(s) (12 ounces) semisweet chocolate chips
2/3 cup(s) whipping (heavy) cream
1 block(s) (8-ounce) cream cheese, softened
1/2 cup(s) chocolate syrup
2 cup(s) frozen whipped topping, thawed

Directions

1 .Heat oven to 350°F. Line a 13x9x2-inch baking pan with foil. Let some foil hang over the edges. Set aside.

2. Stir cookie mix and cocoa powder in large mixing bowl until well mixed. Add butter and egg, stirring until soft dough forms. Add pecans and coconut; knead to combine.

3. With wet fingers, press dough evenly over prepared baking pan. Bake for 12-15 minutes or just until set. Cool completely.

4. Place chocolate chips and whipping cream in medium saucepan over low heat, stirring until melted and the mixture is smooth. Spread 1 cup evenly over cooled cookie base.

5. Meanwhile, beat cream cheese and chocolate syrup at medium speed with an electric mixer until smooth. Add whipped topping and beat until light and fluffy. Spread cheese mixture evenly over ganache layer. Carefully spread remaining ganache evenly over cheese filling.

6. Refrigerate for 6 to 8 hours or overnight. Lift bars with foil handles. Run wet knife around edges of cookie to peel off foil. Cut into bars. Store covered in refrigerator.